Thursday, July 30, 2015

Day Two: Rock the giftcard boys


Good morning! Day two of our Color Me Grateful August release and we have some rockin fun for you with Well Played! Marcy's inspiration behind this set is fun and sweet. Be sure to check out the Power Poppy Blog for all the details!  


I have boys as you know and thought a fun idea would turn this into a boy creation today using Well Played. This is a wallet gift card holder and if you want to create your own check out my Wallet Giftcard Tutorial. These are super easy and personalize the gift card a little more I think. Especially these teenage years and what to get them. Oh my... 
Here is the inside with the card opened up for you to see. Voila! 


Be sure to check out the Bloom Brigades creations today:


Wednesday, July 29, 2015

Day One: Crabapples anyone?


Good morning and welcome to day one of the Color me Grateful August release! This months release is exciting... but honestly, what release isn't. Right?!?!?  hee hee  Marcy has some wonderful inspiration behind this new set called Happy Crabapples over on the Power Poppy Blog


Stepped out of the normal design today with a sentiment focused card. The sprigs are stamped on white cardstock and colored with Copic markers. I delicately cut around the image and then popped it up on dimensionals for a corner accent. This quote is awesome! right now this is a breath of fresh air for a friend of mine and I know she will appreciate it. A few simple touches of rounded corners, some flourished jewels and sparkles to finish it off. Voila!

Be sure to check out the Bloom Brigades creations today: 


Saturday, July 25, 2015

Holly of a day and sale!

Good morning! Did you happen to see the sale going on over at the Power Poppy Store? Some of the details are below and you can always check out the Power Poppy Blog for more info. 


For one day only — 12 am Saturday, July 25 through 12pm midnight central time — Power Poppy’s entire stock of the Happiest Holiday Collection will be 20% off! What a wonderful way to stock up on a little polymer Christmas spirit. It might be July, but we’ve got plenty of holiday cheer up in here!
If you’ve jumped into the digital image craze, we have something JUST FOR YOU! The 25th, which means it’s time a Digis on the 5s release! This digi is full of Christmas flair with a beautiful display of holly, berries and not one, but two perfectly scripted holiday sentiments! And, GUESS WHAT?
THIS DIGITAL STAMP SET WILL BE HALF OFF! 
Be sure to get our digital Hollyberries set for only $3.


This new digi called Hollyberries is wonderful and has so many possibilities. This card is pretty clean as I only added a decorative edge to the bottom of the base card stock and designer paper background. A ribbon bow in the corner with some sequins scattered about and sparkles. Voila! I do like this card and it is a 5x5 so I can add lots of holiday greetings inside.  :-)   

Be sure to check out the Bloom Brigade creations: 
Allison Cope
Christine Okken
Leslie Miller
Tosha Leyendekker
Cheryl Scrivens 

Friday, July 24, 2015

Stamping Bella's Blog Hop with CardMaker Magazine

Welcome to the Stamping Bella's and CardMaker Magazine Blog Hop. If you just arrived from


You are in the right spot. Just starting with us? Then head back over to the CardMaker blog to start hopping! Stamping Bella's has a generous $25 gift certificate they are offering for entries in the blog hop. Be sure to read all the details and rules on the Stamping Bella's Blog


My card is using Uptown Girl Fiona loves flowers. She makes me smile! After I stamped the image on white card stock, I then stamped a few more on scraps of paper so that I would pop up the flowers. They are colored with Copic marks along with the main image. I cut around each flower and cut between the petals and rolled the back to create depth. Added a glue dot to each and placed over main image. A little bit of sparkle and the main panel is finished. Wrapped some lace trim and ribbon around the designer paper, some pearls to finish it off. Voila! 

Your next stop in the hop is over to:

Traci McDonald Blog. 

Happy Hopping!


Thursday, July 23, 2015

Baby is outside the box


Good morning! Over on the CardMaker Magazine Blog today we are thinking "Outside the box" as I share a creation. Here is a snippet of the creation, so head on over the blog and check it out. Have a wonderful day. 

Monday, July 20, 2015

Card Box Two


Supplies:

Card stock, designer paper desired, adhesive, scissors, decorative dies, scissors and Countryside Bouquet Deluxe stamp set. 


Step 1:

 Cut a piece of card stock 9 inches length x 7 inches width. Score a 1 inch border on all four sides of card stock. Pre-fold and snip ends as shown.


Step 2:

Add adhesive to end tabs that are snipped. Fold inward to form box base. This is what it should look like. Basic box bottom, set aside.


Step 3:


Cut a piece of card stock 4 1/2 inch width x 7 inch length. Score a 1 inch border on three sides.


Step 4:

Take desired die (shown A2 Curved Borders One) place at an angle above the scored line edge. Leave enough space to have a triangle look to the box. Hopefully that makes sense


Step 5:

This is what it should look like after cut. Cut the right (1 inch scored ) panel off. See below picture if needed.


Step 6:

Snip corner tab along scored line. Add adhesive to edge of each 1 inch panel


Step 7:

Start with the bottom panel and slide into box base and adhere. You will have the panel sticking out like this


Step 8:

Before we adhere the left side, snip off the edges of the corner tab as shown. This will help the box flex a bit when you fold in the tab. Fold in and adhere to the box base


Step 9:

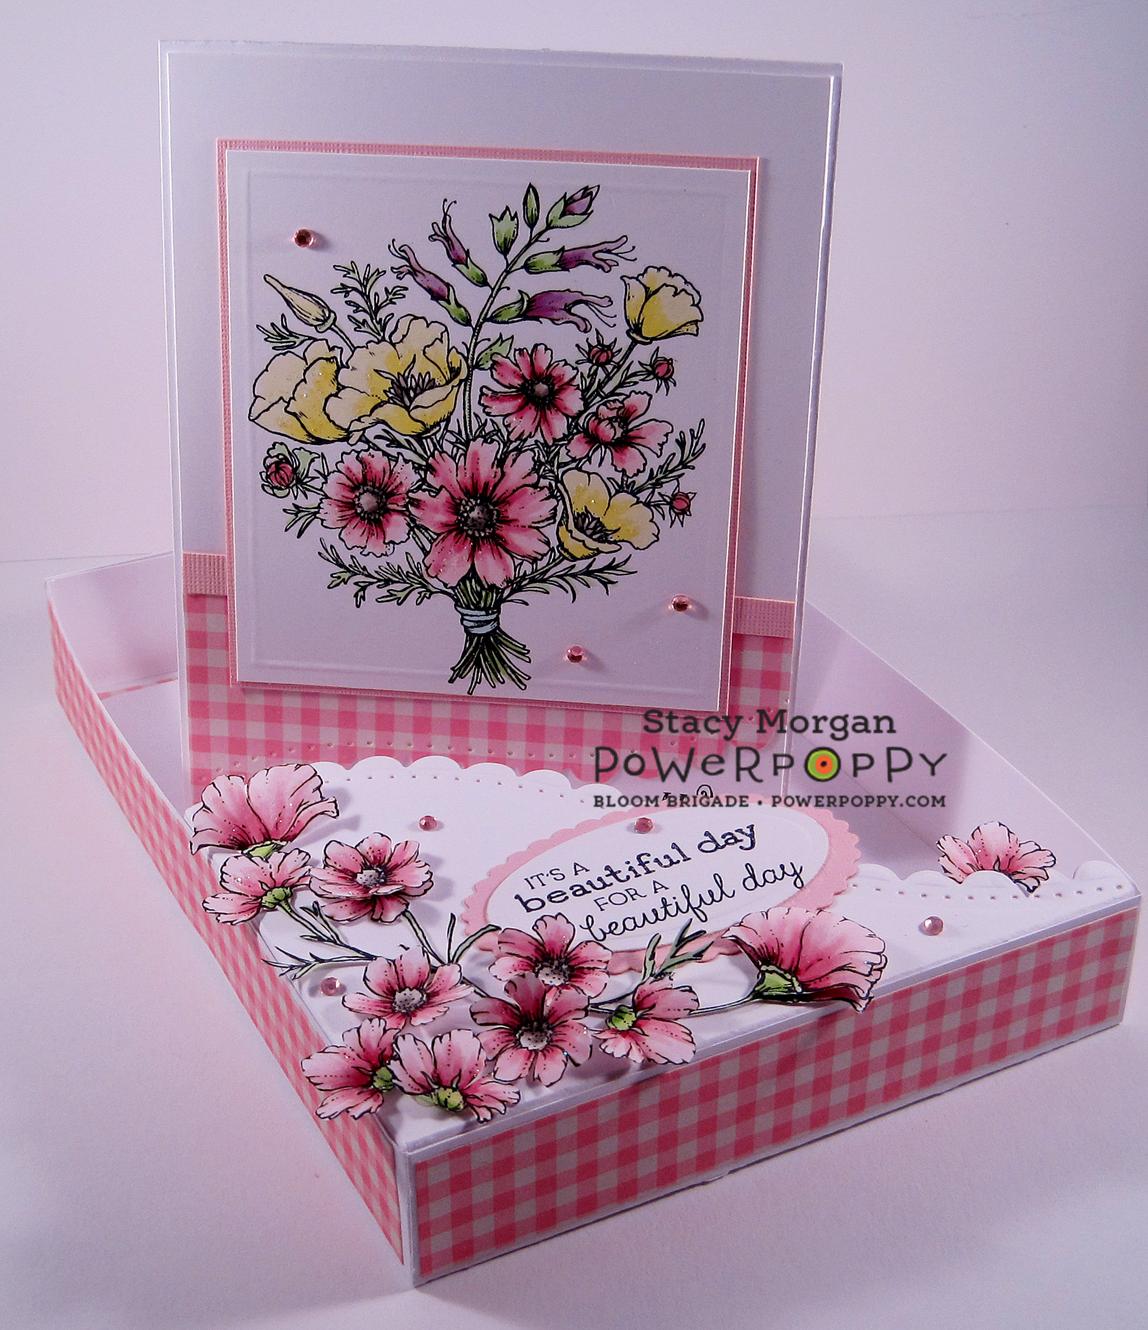
Box is ready to decorate as desired


Step 10:

My final box has added gingham to the bottom (and side panels) so when the cards are used they have a splash of pattern. My flowers are from Countryside Bouquet Deluxe clear stamp set. They are all cut out and popped up for dimension. One of the cards inside and envelope. Easily this can fit anywhere from 6-8 cards and envelopes if they are not bulky. The sentiment is from Best Day Ever stamp set. All the flower petals have added sparkle for fun. Enjoy!


Country gifts


Good morning! Over on the Power Poppy Blog today I am your host for this weeks Inspire Me Monday with Gift Set Part Two. Head on over to the Power Poppy Blog for all the details. Later this tutorial will be added to my SweetAndClassic tutorial site. Thank you for all the sweet comments and encouragement on my tutorials. Having a central place for them is so much easier and cleaner for me. I like neat and orderly as you know.  ;-)
Lots coming in the next week or so with a New Release, the Dirty Dozen Challenges and some more fun. Be sure to keep checking back. Have a wonderful day!  


Sunday, July 19, 2015

Radiant Rectangles Box


Supplies:

Card stock, Radiant Rectangles Die, scissors, scoring tool, cutting mat, adhesive, stamps and embellishments desired.


Step 1:

Die cut 2 pieces of card stock in the outer edge die as shown. Set aside.


Step 2:

Cut a piece of card stock 7 1/2 inches length x 5 1/2 inches width. Score a 1 inch border on all sides of card stock


Step 3:

Snip ends to form tabs. Add adhesive and fold in to form box base. One side is done for you as shown.


Step 4:

Flip box base over and add adhesive. Adhere to one of the die cuts we set aside earlier. The photo on the right is what it should look like once adhered


Step 5:

Cut a piece of card stock 7 1/2 inches length x 5 1/2 inches width. Score a 1 inch border on all sides. Cut the two sides of the length (7 inch side) yet leaving the top two tabs from score lines. Notch the ends of each tab at an angle as desired. Close up on the right side of tab.

Step 6:

Add adhesive to the 1 inch scored panel and tabs as shown


Step 7: 

Take the base box we created and slide the adhesive side into the box and secure the back first. Then adhere the sides as shown on the right. 

Step 8:

Close the flap to the inside of the box as shown. Add adhesive and adhere the second die cut piece to the top.


Step 9:

Here is final box closed, ready to decorate as desired.


Step 10: 

The blooms are called Ranunculus that are colored with Copic markers and cut around for the top of the box. Some added flourished jewels and sparkles for fun. Enjoy!


FS441 Thanks poppies

This weeks Featured Stamper 441 is Misti aka Scraperwannabe. I have adored Misti's work for a long time as she has a love for those furry House Mouse just as I do. And looking through her gallery I thought for sure I would case one of those. However, my new Precious Poppies was calling my name and there were so many cards with poppies to choose that I went with this Poppies card to case. Kept the over all colors, similar layout, a poppy image and some jewels. Changed the stamp, added a ribbon panel, omitted a background panel and popped up the blooms. Enjoy your week Misti!


Each of my blooms is popped up and a little bit of sparkle added for fun. Yes I am enjoying this new poppy and have a gift I am working on for either my mom or mother-in-law not sure who will get it yet. Once I am done I will share with you as it uses this gorgeous poppy set.  ;-)  Hope you have a wonderful day!


Friday, July 17, 2015

Radiant Gift Box


Happy Friday! Did you hear? The newest Digi in our Instant Garden was released on Wednesday called Ranunculus. Beautiful!! Oh one of my favorites and what a joy it is to color. Created another gift box and tutorial using Radiant Rectangles if you want to create your own gift box. Love the versatility of the metal dies don't you?
 My blooms are printed on white card stock and colored with various Copic markers. I cut around all the blooms except the stems in the very center. I needed a really good anchor spot for the top of the box. Besides it was really hard to cut between all those stems. hee hee  


Added a few flourished jewels to the top before I placed the blooms down. Some sparkle was the final touches on the blooms. The inside has the matching papers as the top for fun. Haven't figured out what goodies to put inside, although I am sure some form of chocolate will be the case. :-)  


Check out the Bloom Brigade creations today: