Wednesday, April 29, 2015

Sweet thanks

Morning! Here is my second teacher card that my friend requested. The Sassy Cheryl's digital images are perfect for teachers cards! She is printed on white card stock and colored with Copic markers. 


Some faux stitching around the borders and a few buttons with twine for accent. Sparkle again not very well shown in the photo, but it is there. This is super springy feeling I think. She liked both cards which makes me super happy! Thanks for stopping in today. 


Monday, April 27, 2015

Sassy thank you teacher

Good morning! We have three games this week all at home, but three games regardless. My stamping time is taking a hit as of late. :-)   All for a good cause though... all good! Forgot to post pictures last week, I will try to do that this week. Eventually they will get posted, I promise. Anyways.... 


Working on two teacher requests for a friend. This one is using an adorable Sassy Cheryl's digital stamp. She is printed on white card stock and colored with Copic markers. A little butterfly charm added to the ribbon bow and sentiment tag. Very easy peasy. She does have a bit of sparkle on her hat, however not very well shown in the photo. Thanks for stopping by! Hope you have a wonderful day! 

Saturday, April 25, 2015

Sports Mom's Prayer


This is a very sweet prayer that a friend of mine sent me. Life right now seems very similar to this. 
 :-)    I thought I would share. Have a wonderful day. 


Friday, April 24, 2015

Pink, sweet Camilla's

Happy Friday! Ready for another fun filled weekend? Tomorrow morning we are walking in the March Of Dimes Walk America with the kids down town. Get some good exercise in and help babies, can't beat that!  ;-)  


Earlier this week I showed you a gift wrapped box that this card was delivered in. If you missed the tutorial, check it out here. These Simply Camilla's are stamped on white card stock and colored with various Copic Markers. Some scrap designer paper is added to the bottom of the front main panel and inside to match. A few sequins for accent and voila! Crisp and clean feeling all around! 

Check out the Bloom Brigades creations today: 

Julie Koerber
Leslie Miller
Tosha Leyendekker


Wednesday, April 22, 2015

Rest up and relax


Now this is what I should be doing instead of washing grass and dirt out of uniforms. ha ha!!!  This House Mouse stamp has only been inked up a few times and thought it needed some love today. My card is actually for my secret house mouse deliveries that I have been doing. She is super stressed right now and this is the perfect card to say rest up and relax for a little bit. I stamped the image on white card stock and colored with various Copics. A simple layer or two of designer paper and a fancy edge using Nostaglia Die-Light. Added a brad and circle topper and voila! Very easy peasy card. Have a wonderful day. 

Monday, April 20, 2015

Hello Friend gift wrapped

Good morning! Hope you had a wonderful weekend. We did get a little relaxing in yesterday after a fun filled Friday and Saturday. Off to the races again this week with one home game and one away game. Later this week I will be sharing some pictures of my boys pitching their first few games.  ;-)  Proud mom and dad over here!  


See my beautiful Simply Camilla's gift wrapped box with creations inside? Over on the Power Poppy Blog today, it's my turn to host the Inspire Me Monday tutorial. Create a quick gift wrapped box for your creations today. Hope you have a few minutes to check it out! Have a wonderful day! 


Sunday, April 19, 2015

FS428 Thanks so much

This weeks Featured Stamper 428 is Mary aka maryj68. Congrats Mary! Colorful and fresh gallery that I really enjoyed looking through. I choose this Grown up Thank you card to case. I kept with the theme of florals in a vase, over all sketch and colors. Changed the stamp, papers and my sentiment panel. Hope you can play along this week. 


My Arranging Roses is printed on white card stock and colored with Copic markers. The sea foam and pink color combo is a favorite color array with me right now, so plan to see more of this soon.  ;-)   Once colored I layered a Beautiful Borders die for the edges and adhered to the base of the card that has two strips of designer paper layered down. Added my sentiment from Dynamic Duos Glads and Gerberas and a few jewels. Voila! 


Friday, April 17, 2015

Flowering Branches


Squeel!!! Did you see the new Instant Garden release on the 15th? Be still my heart right? This is the beautiful Flowering Branches. A few clicks and you can have this in your in box ready to print, color and create with! Check out Marcy's inspiration and notes behind this beautiful drawing HERE


My creation today is pretty straight forward. I really wanted the focus to be on the blooms so I went with a white on white card today. Okay... not much different from normal but you know what I mean.  ;-)  After my blooms were colored I added a Beautiful Borders die cut edge to the left side and a few sequins to the front. My sentiment Happy Mother's day is on a tag that I pierced the edges and notched the end. Some sparkles finishes it off, voila! 


Be sure to check out the Bloom Brigades creations today: 
Allison Cope
Christine Okken
Julie Koerber
Katie Sims
Tosha Leyendekker


Wednesday, April 15, 2015

Blossom treat box


Isn't this the cutest? This is a little blossom shaped treat box made out of decorative card stock. I have made a few of these for the boys teacher after spring break. This was a fun box to create. If you have an Envelope Punch Board you can create your own check, out my Blossom Box Tutorial. Have fun and enjoy!  

Tuesday, April 14, 2015

Toy Wars


This is super creative and very talented if you ask me. I would wage that my boys think this very thing when they are playing.  hee hee    :-)   Boys and their toys. The cop car at the end is perfect!!   Enjoy your day! 


Monday, April 13, 2015

Spring time are you ready?

We sure are ready for spring here. We have some beautiful sunshine right now and its wonderful. This week is running around from game to game but what is knew. :-)  


This is a simple spring creation today. I stamped the beautiful Daffodils on white card stock and scored a border around the frame. Colored with various Copic markers before layering on a shaped frame of designer paper. Wrapped some ribbon around the base and a few jewels in the corner. Voila! See easy peasy. Thanks for stopping in today. Have a wonderful day! 


Sunday, April 12, 2015

FS427 Furry Thinking

This weeks Featured Stamper is Sue aka Gregzgrul. Great gallery of creations. I choose this Furry Favorite card to case. Kept the furry friend, over all sketch and similar papers. Changed the actual dog image, made it a larger panel, added brads. Enjoy your week Sue! 


This fun guy is from Whipper Snapper called Good News Puppy that I bought years ago and enjoy stamping. He is on white card stock and colored with various Copic markers. I added a decorative border to the edge and a few bards. I made this for my friend Leslie who's fur baby has not been well as of late. Lulu is such a sweet puppy and Ranger wanted to make sure she knew we were thinking about her.  ;-)  I hope you get a chance to stamp and play this weekend. 

Friday, April 10, 2015

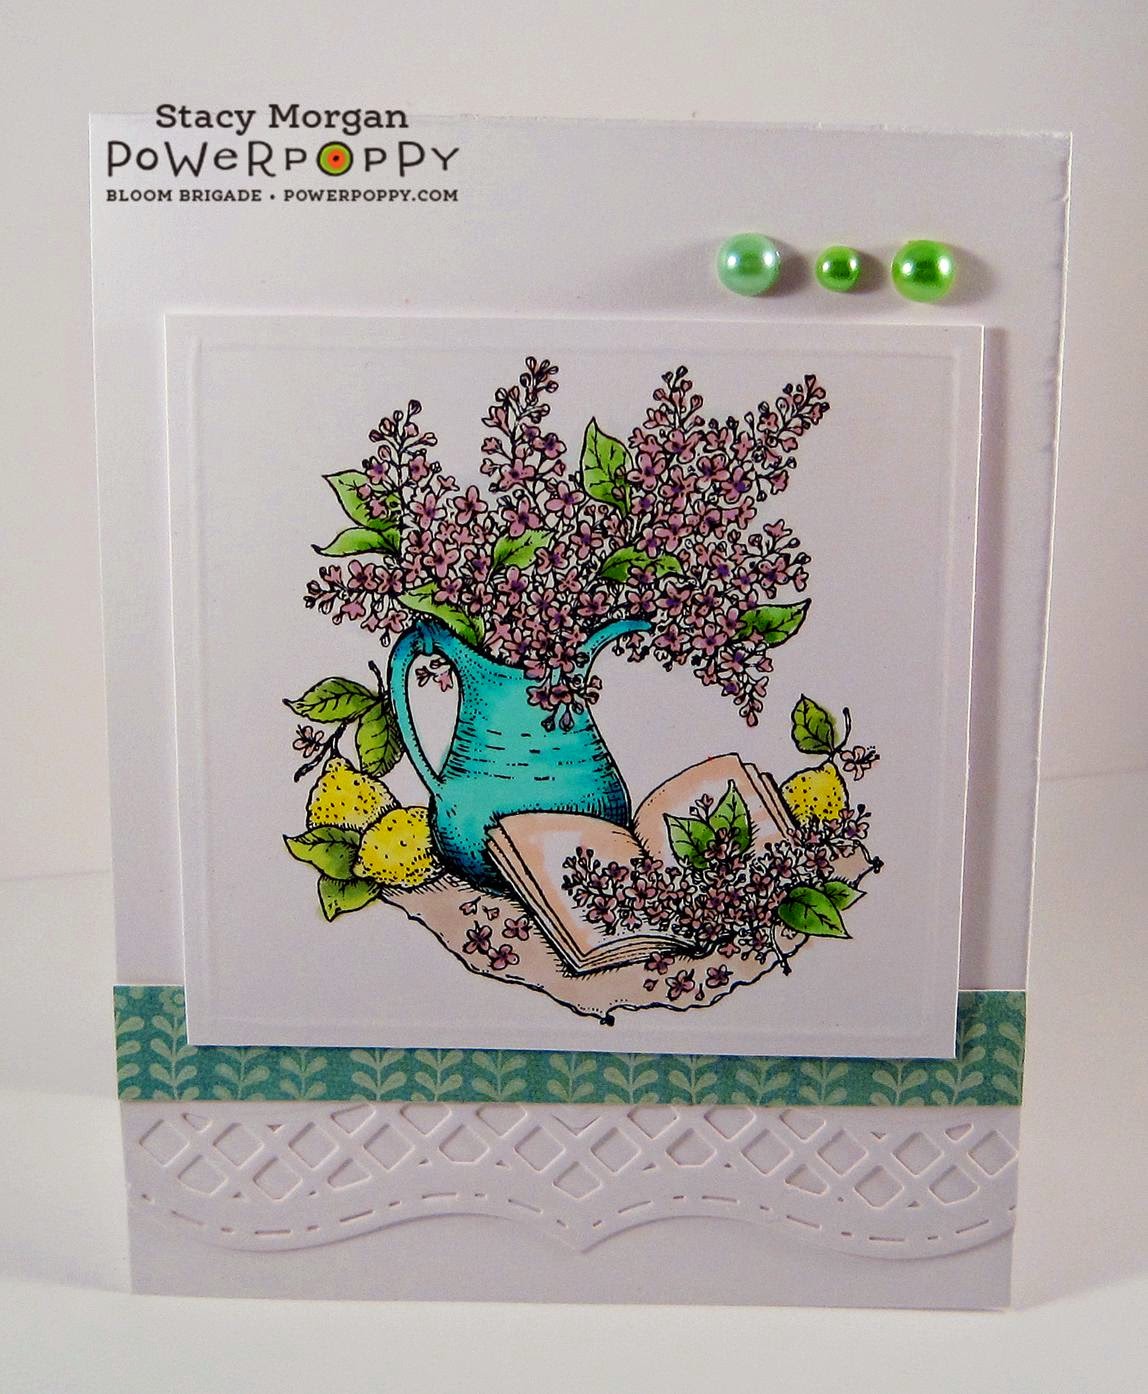
A good read and some lilacs

Happy Friday! I don't know about you but this week was long and tiring. A good book and some fresh lilacs sound perfect right about now. Fortunately for me I have both, as my new book just came in AND I have this beautiful new Lilac stamp to play with.  ;-)  Don't forget the Power and Spark challenge for April is under way. You can read all about it HERE. Hope you can play along. 


My card today as I mentioned is using the beautiful new Lilac Time stamp set. I stamped the vase image onto white card stock and colored with various Copic markers. A simple score around the border and added dimensionals to the back side. Die cut a Spellbinders border for the decorative edge and some scrap paper to cover the seams. Finished it off with a few pearls and voila! 


Check out the creations from the Bloom Brigade today:
Christine Okken
Cindy Lawrence
Leslie Miller
Tosha Leyendekker


Wednesday, April 8, 2015

40th Birthday in feminine style

Good morning! Here is the last of the memorable birthday markers for my friends request. Seems that the "over the hill" theme for birthdays is really depending on the person. Some tease and do it at the 30th, my dad had a 40th over the hill as a joke, my mom refused to acknowledge her 50th, so it depends. My 40th (GASP!!!) was fun and vibrant with colors. I think it is all about how you feel not what your age is. Does that make sense? 


This 40th card is for one a person like me she told me, so I went with fun and cheerful! Dusted off my Numbers Blossom set for the year marker that is stamped on white card stock and colored with Copics.  Die cut with a Spellbinders oval frame and popped up on dimensionals. I adore this Spellbinders border die, but you can never stand the card up straight if you do the base layer also. Well easy fix for the photo with a little salt and pepper shaker to hold it up. hee hee   Wrapped some ribbon around white layer and added a tiny flower to the center. Some pearls and Cheery Lynn flourishes die for the final touch. Voila! Hope you have a wonderful day! 


Monday, April 6, 2015

50th birthday in style


50 and distinguished I think they say it is for men, right? I wanted to create a Cary Grant feel with this card request. The jacket turned out good, the pocket is hard to see in the photo being it is black on black. However you can see the little tissue sticking out of it with the 50 on the front.  :-)  I know who this card is for in her request and he will like this. The 50 is using the Numbers Die-light from WOJ. Added a few buttons and voila! Have a wonderful day.


Sunday, April 5, 2015

FS426 Birthday Blooms

Happy Easter! Enjoy celebrating our Risen King today with family and friends.

This weeks Featured Stamper 426 is Stef aka Dahlia19. I choose this Petal Birthday card to case as I have a few birthday requests to fill so this was perfect. I kept the over all layout, a flower image, the rounded two corners. Changed the flower, colors, added the birthday number and ribbon to the button. Hope you can play along this week!


As you can tell I can't get enough of these Camilla's from Simply Camilla's. This is actually a special request from a friend. She wanted this flower and the 30th year marker on the birthday sentiment. You will see the 40th and the 50th birthday requests later this week she asked for also. Trying to get all her requests done this week so be on the look out for more cards. The blooms are colored with the fun black and white feel of "over the hill" with just a hint of color on the tips. She was super excited and said it was perfect for what she visioned. That is always nice!  :-)  Anyways, a button twine bow for the corner and a Beautiful Borders lace trim out of white paper for the backing and voila! Have a wonderful day. 

Saturday, April 4, 2015

Spring Basket


Supplies:

6 x 6 piece of card stock or designer paper, scissors, adhesive, Envelope Punch Board and embellishments. 


Step 1:

Place 6x6 piece of designer paper or card stock at 1 1/2 inch marker. See right photo for close up. Punch and score all the way down


Step 2:

This is what it should look like. Turn card stock 45 degrees and punch and score at the same 1 1/2 marker on all four sides of card stock. The photo on the right will be final result. 


Step 3:

Turn card stock over. You should see the valley you punch to the right along the measurements panel. Place card stock at 1 1/2 inch marker as you did for the other side, punch and score. You will do the same to all four sides as you did the first side. The photo on the right is what the end result will look like. Pre-fold all score lines

Step 4:

Cut along the thinner inner panel towards the square in the center. This will form the sides of the basket. See photo as I have one side turn up to see the cut lines. Decide if using designer paper which side you want as the inner part of the basket and the outside. I want this side as the outer part of the basket


Step 5:

This part that is hard to see in the photo, sorry about that. The tip of the score tool is where I have added glue dots in the corner. You want to add glue dots to the four pieces on each side. I have the two right sides glue dots adhered to them. See photo on the right. You will over lap these two pieces and adhere them together. I basically lined up the top edges and formed the triangle you see at the bottom.


Step 6:

When both sides are glued together this is what it should look like. Now fold the side flaps up and over and adhere to the inside of the basket. The photo on the right is what it will look like. Add handle as desired and finish decorating


Step 7:

Final basket with little carrot chocolates insides for table decoration. The flower is Simply Camillas that is cut out in three layers and up on dimensionals. Enjoy

Basket of carrots

This is a fun little treat basket that uses the Envelope Punch Board. I have to say I sure have enjoyed creating with this the last few weeks. There are so many things you can do with it and I haven't even gotten to all the ones I have pinned yet. ha ha  If you have the board and want to create your own basket, check out my Basket Tutorial


This one has some chocolate carrots inside which are almost gone mind you.  ;-)  This beautiful flower is using the single bloom in Simply Camillas that is layered a few times using dimensionals and adhere to the side of the basket. How cute is that! Hope you have a great weekend!


Friday, April 3, 2015

Soft Daffodils


Happy Friday! Our Spring Break is coming to an end which is always bitter sweet. The kids enjoyed sleeping in and our lazy days. However back to the grind as they say.  ;-)

This months Power and Spark Challenge is brought to us by Ally. She is challenging us to bring the soft colors of spring inside with Pastel colors. Swoon over the softness of the fresh spring flowers blooming and have fun coloring.   


Remember the gift box that I showed you a few weeks back using the Square box tutorial? Well this is one of the cards in the gift box. I used the beautiful Daffodils for my pastel colored card today. The image is on white card stock and die cut with a Spellbinders oval. Layered up on a Decorative Oval and dimensionals popping up that frame on the card base. A little bit of white crochet ribbon and some soft pink over lay. A few sparkly jewels and voila! 


Be sure to check out the Bloom Brigade creations today: 
Allison Cope
Christine Okken
Cindy Lawrence
Julie Koerber
Katie Sims