Original design
Supplies:
6 x 6 piece of card stock, Envelope Punch Board, scissors, adhesive and embellishments
Step 1:
Place card stock at 1 1/2 inch mark punch and score. Move card stock to 3 inch marker, punch and score. Move card stock to 4 1/2 inch marker, punch and score. The photo on the right shows what it should look like
Step 2:
Turn card stock 45 degrees and punch and score at the same markers as Step 1. You will punch and score all four sides the exact same. This will be final result when done. Round each of the corners if desired.
Step 3:
Each of the four sides has scored squares. Cut the middle tabs as shown, leaving a triangle tip. The photo on the right shows with one side cut, and the tip of the scissors at the starting point for the triangle. Cut down the two sides. Repeat for the remaining sides.
Step 4:
This is what you should have now. All the little tabs are lifted up in the photo for you to see what is cut. if using designer paper determine what side you would like as the outside. The flowers will be the inside of my blossom box
Step 5:
Turn card stock over. Add adhesive to the tabs you cut all across the tips. Here I have the bottom two tabs with glue dots for the photo. Add to the other sides tabs as well
Step 6:
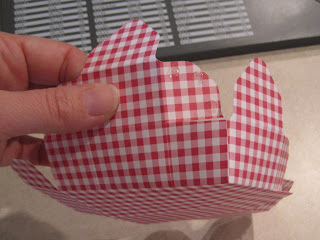
The tabs will go on the inside of the triangle piece and adhere with the sides lined up. Here I have the right side tab adhered with the sides lined up. Don't adhere the left tab yet, turn to the next side and do the right tab as you did this one. Essentially every other tab will be glued. See photo on the right
Step 7:
Now with the remaining tabs, line up the triangles left side and sorta pinch the triangle side inward as you adhere the sides together. This will naturally turn inward, but to avoid wrinkles help with finger if needed. Finish this step with the remaining sides.
Step 8:
This is end result, decorate as desired. The one on the right is holding some milk chocolates for the boys teachers. I made a few of these for them as they return from Spring Break. Enjoy!


