Tuesday, March 31, 2015

Sense and Sensibility Day 3

Welcome to day 3 of our Sense and Sensibility April release. Today is the awesome Daffodils! Woot woot.... If you noticed last month the new Digital image Dancing with Daffodils was outstanding.  Now this new one to go with it.... Be still my heart! 


A bold and vibrant card today using Daffodils. I do like the boldness of this card and yes I did color a few of them orange. Hey... a girl can color how she likes, a hybrid coloring of sorts if you must.  :-)  This is stamped on white card stock. Rounded the corners along the bottom panel and a scrap piece of designer paper for fun. A few sequins and voila! Clean and simple card. 


Marcy has some inspiration behind this set today on the Power Poppy Blog. And time is running out on our Birthday Bash festivities. Be sure to check that out HERE


Monday, March 30, 2015

Sense and Sensibility Day 2

Ready for us to bring you another day of awe inspiring creations? I sure hope so! You still have time to enter into our Birthday Bash festivities. Be sure to check it out HERE! Inspiration behind this new set called Simply Camellias is over on the Power Poppy Blog. Again sit back and check out the creations today.  ;-)


Now this makes you swoon, right?!?  Oh my... this single Camilla in the bowl is just heavenly sweet I think. Today we are welcoming in the set Simply Camillas. Does it ever make me smile.... I stamped this flower onto white card stock and colored with various Copic markers. The shape is die cut using Spellbinders Decorative Labels One die


Wrapped some lace trim and ribbon around the designer paper before adhering to the white base. My little charms I have are not to sit in the jars anymore I have determined. ha ha  So a cute butterfly is tied around the ribbon bow with some twine. The base is die cut with yet again a favorite Spellbinders A2 Bracket Borders One die. Added my sentiment and a few pearls and Voila! 


Sunday, March 29, 2015

Sense and Sensibility Day 1

I am super excited to share this months new release for April called Sense and Sensibility! We have some fantastic new sets to share with you. Marcy has some inspiration behind this new set over on the Power Poppy Blog for you check out after you are done hopping today. So grab some coffee, tea or soda and sit down for a few minutes this morning.  ;-)


My creation today is vivid and bright, just the way I like it! This gingham back drop was perfect for my Lilac Time image today. The lemons add such an appeal to the vase full of Lilac's don't you think? This image is stamped on white card stock and colored with various Copic markers. A scored border around the edge before I layered some rich eggplant colored card stock underneath and for the base layer.  


Wrapped some scalloped white ribbon with seam binding ribbon bow around the bottom. Added my sentiment and a few purple pearls and voila! Don't forget that the Birthday Bash celebration is still going on and you have time to join in and win. Check out this post HERE for all the details. 


Friday, March 27, 2015

Birthday Bash!


Power Poppy's 1 year Birthday Bash is under way! Head on over to the Power Poppy Blog for all the FUN, Details and Prize info!!!

Don't forget to stop back by here on Sunday for a sneak peek at the BRAND NEW sets for April! Oh yea.... you are gonna be drooling and gasping at the new line of stamps!  Have fun and see you back here Sunday!!! 


Thursday, March 26, 2015

Surprise!!! Happy 1st Birthday


Surprise!!! Did you hear? Power Poppy is 1 year old today! My goodness.... this year went by FAST! There is a whole bunch of fun over on the Power Poppy Blog in celebration for our 1 year birthday. In fact, if you click HERE you can find out how you can win $100 gift certificate to the Power Poppy Store. YES I said $100 smackers! Not to mention all the other FUN we have going on over there. So make sure to take a peek on over at the PP Blog!


Before I share with you the details on my birthday card, I wanted to say a little something to the incredible Marcy aka Marcy Poppins. Wow... I say this every time I open your package of stamps I just ordered and think... it can't get any better than this. Seriously, Marcy you have the artistic talent to bring flowers to a whole new level and it amazes me each set. The attention to each petals detail are awesome and the sweet little creatures you add as of late make me smile. Truly your gift to draw is effecting everyone and energizing for all. Your HUGE heart and encouraging words not only for us but your readers is wonderful and not something everyone does. I know I appreciate all you do!  I LOVE that you are so willing to share your inspiration behind your art work and what inspires your designs. It is truly an honor to work for you girlie. Enjoy and congrats on your 1st birthday surprise!  Big hugs!
Onto my card....


I felt the need to go with one of the very first stamp sets that PP released in their debut, Azaleas. This flower stole my heart from the get go. I have stamped them on white card stock and colored with various Copic markers. I then cut around the edges leaving a little bit of white space and mounted up on dimensionals. A spellbinders decorative edge with a birthday sentiment from Dynamic Duos Peonies and Tulips stamp set. Added a few sequins and voila! Happy Birthday Hopping and FUN!


Saturday, March 21, 2015

Reality is bitter sweet sometimes


Good morning! Thought I would share a picture for you of what my life is right now. My husband and I have woke up to a reality as of late. The above photo is from a Calvin n Hobbes comic strip that is one of my (and husbands) all time favorites. Calvin the little boy is super active, fun and creative. His antics always made me laugh. I told my husband if we have boys like that oh we are in a world of hurt. One day we thought oh my goodness... this is our twins. HA!!!  This picture reminds me of how sweet they are still at heart and I just smile. Miss these days...


And then we woke up to this one day. ha ha!! This is my other favorite comic called Zits. His name is Jeremy and a teenage boy through and through. The more we look at our twins the more we see them in these comics. Aaaahhhh.. the time sure does fly it seems. 

The boys would read the Calvin and Hobbes comic books we have and giggle and play out some of the things they read. Now they read the Zits and laugh at those and agree with some of them. Especially with the computer related ones. Although its mostly outdated computer lingo as hubby says but funny the same. When I am dropping them off at school and watch them walk in I just see how grown godly men they are becoming and I just smile..... and maybe sniffle a little. It is a natural part of life growing up I just didn't think it was coming so fast.  ;-)  Anyways, just wanted to share a little smile with you and let you know where I am spending my time more lately. With these two young men before the are gone and don't want to spend time with the old folks. hee hee  Hope you have a wonderful day. Go hug your kids!  :-)  


Friday, March 20, 2015

Dancing with Daffodils

Happy Friday! Did you see Power Poppies newest Instant Garden release? I showed a little bit earlier this week and the Instant Gardners did their magic on the 15th. Check it out HERE! The new digi is found at the Power Poppy Store HERE. Welcome in our new Dancing with Daffodils!! Woot woot!!!


My creation was inspired  by a photo I found on Pinterest as I was looking up Daffodils. See below photo.  We also have a board on Pinterest full of some beautiful creations already by the Instant Gardners for you to check out. They are commonly seen in yellow's but they do have some pretty cool variations of them which is awesome. I went with a clean and crisp feel for my card today. 


My image is printed on white card stock and colored with Copic markers. Scored a border around the edge and added dimensionals to the back.


Here is the photo that I found on Pinterest of these unique Daffodils. Isn't it cool? I really liked the non traditional colors at least they were new to me. A simple delicate edge along the bottom and a few sequins to tie my sentiment in and voila! Our Go For The Gold Challenge is still collecting your beautiful creations. If you haven't played yet you still have time. 


Wednesday, March 18, 2015

Welcome


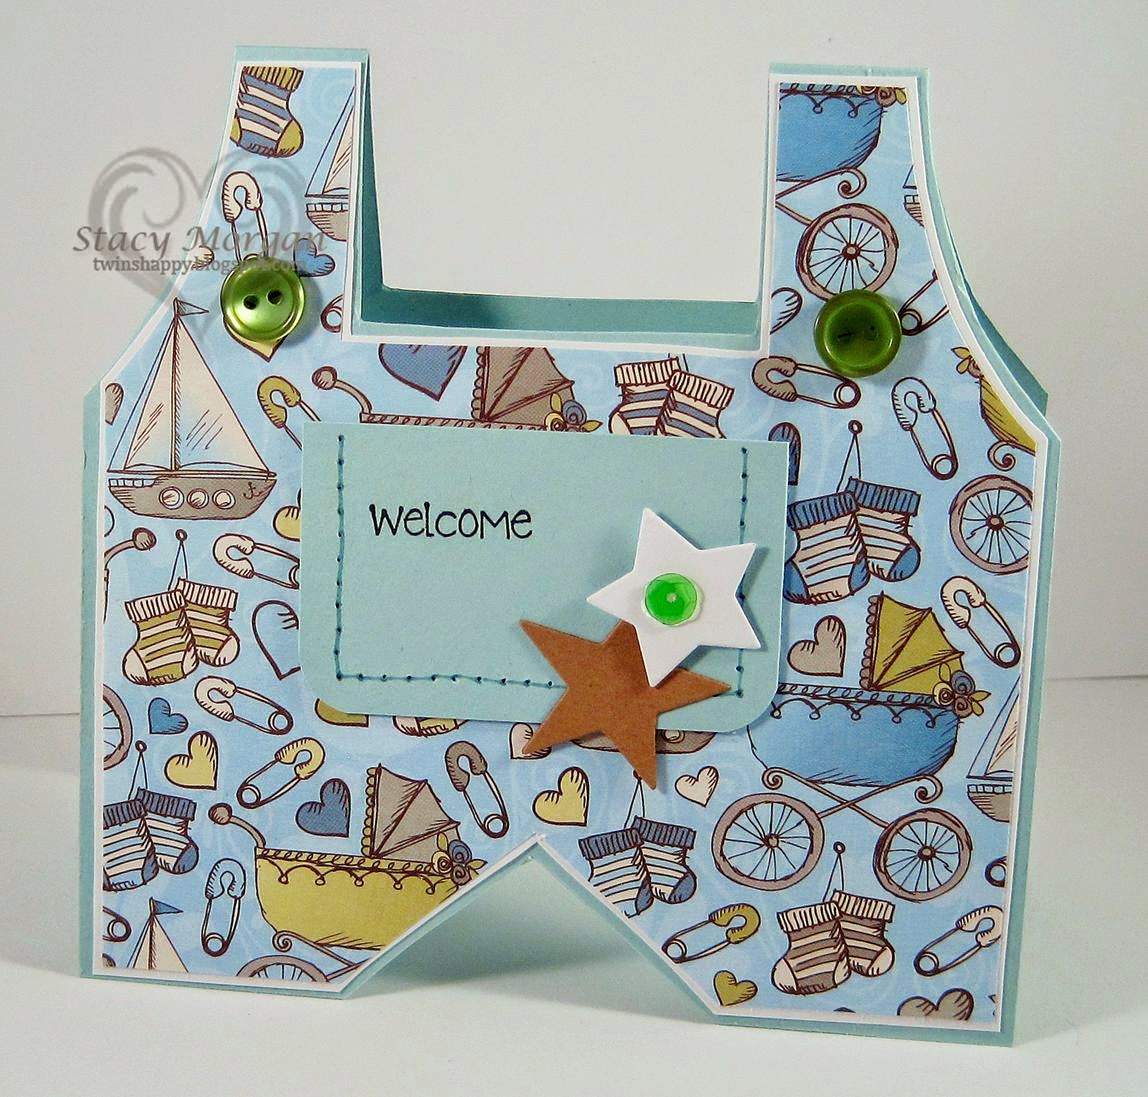
Happy Wednesday! Today is a quick baby card for a friend of mine who just found out she is having another boy. Yea!!! She is super excited as she has two boys already. However one of the boys wanted a sister, where the other wanted another brother. It was a 50/50 chance she told him. ha ha!!!  This was a pretty easy card using my Overalls Tutorial for the shape. This baby paper I have had forever sitting in the bin figured now was a great time to use it. Added some faux stitching to the pocket and some buttons for the overalls. Voila! Have an awesome day! 


Tuesday, March 17, 2015

Square Box One


Supplies:

2 sheets card stock (8 1/2 x 11), scissors, adhesive, cutting mat, scoring tool, and embellishments.


Step 1:

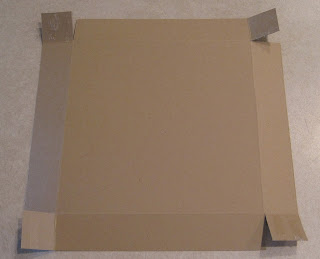
We will make the base of the box first. Cut a piece of card stock 8 inches x 8 inches. Score 1 inch border down all four sides. Pre-fold the score lines as shown. 


Step 2

To create the tabs to form box, turn card stock over and cut one edge of each of the four corners as shown. Add adhesive to the tiny tab, turn card stock back over and adhere to the inside panels. Box should look like photo on the right

Step 3:

Let's create the top of the box, same way we did the base. Cut a piece of card stock 8 1/4 inch x 8 1/4 inch. Score 1 inch border on all four sides. Snip ends as you did for the base and adhere to the inside


Step 4:

Here is what the box should look like. Very easy and ready to decorate. You can add designer paper to the inside of the base bottom if you would like too.

Step 5:

My final box decorated using Dancing with Daffodils. Some springy paper for the background and a little bit of lace trim and a ribbon bow to tie it all together. This holds a set of 5 x 5 inch greeting cards that I will have on my blog later this week. Enjoy!


Monday, March 16, 2015

Daffodil gift box set

Good morning! Did you see?? The new Digi release from Power Poppy is HERE!!!!  Woot woot!! This new gorgeous flower is called Dancing with Daffodils! You knew I was going to make a few cards with this set already and I needed a gift box to hold them all. So here is my Square box tutorial if you want to create your own. I love square cards, usually 5 x 5 in size. So this box was perfect to display them as a gift. 


My base is out of kraft card stock with some springy like papers and faux stitching around the edges. Wrapped some lace and ribbon around then adhered to the box lid. Tied my ribbon into a bow and tied off with a button and twine combo. The Dancing with Daffodils is printed on white card stock and then die cut with Spellbinders classic circles. Colored with copics and layered on a kraft circle. A few pearls to finish it off. Voila! Hope you check out my Square box tutorial. Have a wonderful day! 


Sunday, March 15, 2015

I didn't forget your birthday

This weeks Featured Stamper 423 is Chitra aka Chitra. Delightful gallery but this one really stood out at me called Happy Birthday. I kept the over all design, an elephant stamp and similar papers. Changed the colors, stamp and sentiment placement. 


I pulled out this retired set from CTMH called Zoo Friends the other day and felt the need to use it again.  ;-)  This set is darling for kids cards. Easy peasy card too with just a little bit of designer paper. I have the elephant cut around and popped up on dimensionals. Simple and sweet. Hope you have a wonderful day. 


Saturday, March 14, 2015

80's and 90's fun night

You are at Stacy's blog, no need to panic. HA!!! As you can see my husband and myself are a little out of character.  ;-)  On Thursday night we were at the Junior Achievement Fundraiser for work. DH bowling team was 90 hair band rockers, and my team was the 90's grunge. The night was full of different decades (theme of this years event) and some really creative people out there. 


 We had so much fun and to be honest I kinda liked the grunge dress. ha ha  Lots of baggy clothes, but way too much make up for me. The hat was fun and my hair didn't need a lot of fuss which was nice.  My husband on the other hand... oh my he really got into his character. ha ha   For those few of you stamping friends that have met him in real life, you are probably still on the floor laughing thinking NO WAY!!! Don't worry, my mom couldn't stop laughing when she came to the house either.  :-)  And NO, those are not real tattoes. They are some horrible (sorry for you tat lovers out there) sleeves he bought to wear with his wig.  ;-)   All around fun night and a great fundraiser for the JA! Thanks for stopping in today. 


Friday, March 13, 2015

Burgers for $$ Bucks $$

Good morning! This month's Power and Sparke challenge is hosted by Tosha! The challenge is Go for the Gold! My creation today is a two for one as I used Gold and I am showing you one of the fundraiser ideas that I have been working on. 


Baseball is having a fundraiser bake sale. Pinterest had these totally fun "cupcake hamburgers" that I thought would be perfect. So I created a fun tag to hold them as a thanks for supporting the team and our fundraiser using the stamp set Play Ball! The tag has a gold star, gold brad and tied off with gold cord. 
I will apologize for the picture being out on the counter. To be honest I was trying to get these decorated, bagged and tagged and with so many to do this is what I was able to do for the photo. ;-)  


This is what the actual cupcake burger looks like before I packaged it up. How cute is that! Should make for some good sales, I hope. The boys loved them. Yes they had to try them before I could package them up. Something about making sure they were done?!?!?  ha ha The burger part is a brownie that I cut using cookie cutters. Colored frosting for the lettuce, ketchup and mustard. The seeds on top are just regular frosting.  


Be sure to check out the creations from the Bloom Brigade today: 
Allison Cope 
Christine Okken 
Cindy Lawrence 
Dawn Burnworth 
Julie Koerber 
Kathy Jones 
Katie Sims 
Leslie Miller
Tosha Leyendekker


Wednesday, March 11, 2015

Tote One

Supplies:

Card stock (11 x 8 1/2 inches), adhesive, scoring tool, designer paper and embellishments. NOTE: Original Design by Silvey Shim


Step 1:

Score along the length of your card stock at score marks 3/4 inch, 4 1/2 inch, 6 1/2 inch and 10 1/4 inch. It should look like the above once scored. 


Step 2:

Turn card stock and along the width side score at 2 inch and 6 1/2 inches as shown above. Pre-fold all score lines. See the photo on right


Step 3:

Turn card stock back to length side and from the center square on each end score a little mark at 2 inches to each side of the score lines. Then from the corner of that box score to your little 2 inch mark you made. Here is  a close up and to the right the photo shows what it should look like

Step 4:

Now you are going to pre-fold the inner part of the tote. Here is a close up of what one fold will look like. The photo on the right is what all 4 sides will look like pre-folded


Step 5:

Turn card stock over and decorate the outside with designer paper or even the inside if you would like. Here I just did the outside.


Step 6:

Turn card stock back over and ad adhesive BELOW the diagonal lines only. See photo. The photo on the right is with just one side folded and adhered into place. This is why we pre-folded earlier for ease when we are putting together.


Step 7:

Here is the tote with all sides adhered down. Photo on the right shows the bag closed with just finger tips. You have several options at this point. If you want it to stay closed use magnets, ribbon etc. If you want it to stay open add glue dots to the inside of the triangles and adhere to the sides (see my photo below) or you can add handles that close it together. Lots of easy and fun options


Step 8:

Here is my final tote with some cookies inside. My scripture is using ODBD Scripture Collection One die cut with a oval die. Added some flourishes jewels and a few rosets. Enjoy