Showing posts with label SweetAndClassic. Show all posts

Monday, March 18, 2019

Card Box Four Tutorial with Natural Beauties

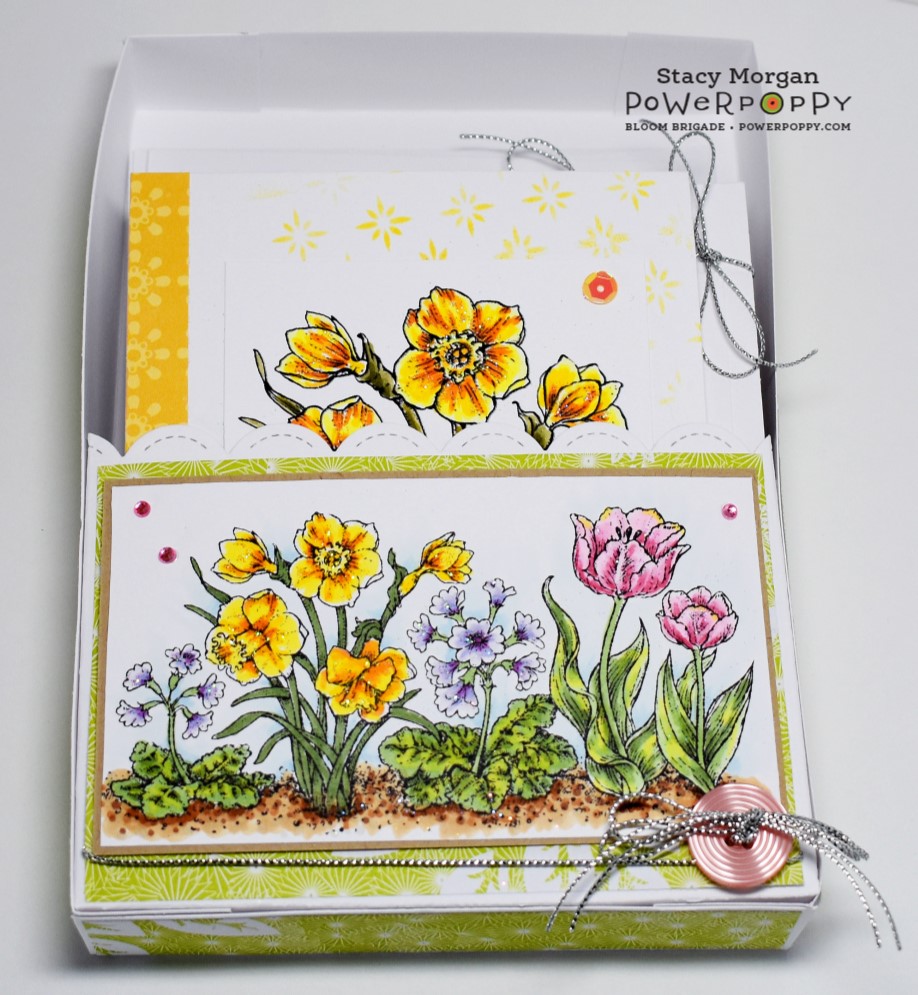
Good morning! Today I am going to show you the final part of my Spring Border gift set with a tutorial for Card Box Four. This is similar to the other versions just a little different for the front of the box. This is what the final box will look like when complete. 


Below is the tutorial for you using Natural Beauties for the box front since that is the clear stamp set that Marcy used for her Spring Border One and Spring Border Two digital versions. The Natural Beauties is like a mini me set, super cute!  :-)

 Step One: Cut a piece of card stock 9 inch length by 7 inch width. Score a 1 inch border along all sides. Add designer paper if desired as I have done here. Snip the ends of each corner, add adhesive and fold in to create base. Set aside.

 Step two: Cut a piece of card stock 4 1/2 inch width by 7 inch length. Score a 1 inch border on three sides. Add your desired decorative cut edge. Here I used Lawn Fawn's stitched scallop edges. Snip the two ends as shown.

 Step three: Add desired designer paper or stamp if you wish. I added silver cord to the bottom as I will be adding other embellishments later.

 Step four: Add adhesive to all edges and to the ends you snipped. Start by adding just the end to the box inside as shown. This is the view and way I adhere to make sure that it lined up with the box edge.

Step five:  This is the side view for you to see that it lines up. Next add one side at a time and press to make sure it adheres to the edge. This will help with the strength of the sides of the box as well.

 Step six: This is what it will look like. Finish decorating as desired.

This is my finished box without the cards inside. I added a kraft layer behind my image from Natural Beauties and a button with matching silver cord. A few rhinestones and then some sparkle. 

Here is my final card box four again with the envelopes and the cards inside from the gift set. Voila! If you want to see the other versions of my card boxes just check the side bar at the top under Sweet and Classic Tutorials.  Thanks for stopping by today.

Friday, July 28, 2017

Abundance Collection Day Three


Welcome to Power Poppy's Abundance Collection sneak peeks! Enjoy the sneak peeks so far?  :-) We are excited to share today Tree of Life. What a beautiful tree and lots of color options. Color explosion on this one I would say. Created a box for today's using the basic Square Box tutorial I did awhile back. Added faux stitching around the base layers. That ribbon slider fit nicely and since I have several of those still left from who knows how long ago figured why not. ha ha


And speaking of things from long ago how about those jars of Pearl-Ex pigments? Anyone besides me still have those jars around? Well I added duo green-yellow to each of the leaves for a shimmery effect you can see below. I had to take the photo sideways to pick it up the best I could. It looks beautiful in real life.


Check out the Bloom Brigades creations today:
Allison Cope
  Christine Okken
Cindy Lawrence
  Julie Koerber
 Katie Sims
Tosha Leyendekker

Now before you go we have a few reminders for you.
Our July Power and Spark "On the Case" challenge has a few days left. This is your chance to win $50 in Power Poppy bucks.
This weeks Hues to Use challenge is posted which is your chance to be a guest designer with us.
Marcy has information posted on the blog to be sure to check it all out.
Thanks for stopping in and see you tomorrow with another new sneak peek.


Monday, May 8, 2017

Card in a box tutorial

Good morning! We are in the baseball play off's boys and girls, woot woot! Saturday was a beautiful day on the field and we had a great team we played for the double header. Gracious hosts especially since it was a two hour drive to their school. EEK!  Great time with the kids on the road trip up and beautiful landscape along the way. This week is game one and two if we win out we continue otherwise it is winner goes home. Let's hope we can win out and continue to the championship. Now for my creation...


 Mother's day is just a few days away so I figured I better get going on my cards. This is my first Card in a box along with new dies from Power Poppy. This is the final project with the tutorial just under for you to create your own. So let's get started.


 Supplies: Peony Muse stamp set, Peony Muse dies, Surprise box die, cardstock, adhesive, embellishments desired.


Step 1: Die cut box base and designer paper tabs if desired. Also one insert for the center of the box.


Step 2: Adhere designer paper tabs to the box if using designer paper. Pre-fold your edges and the tabs. Add adhesive to the tiny edge to secure to edge. Note, when you fold the box the decorative edges will want to be facing out. Pref-old before to get the idea of the shape.


Step 3: Fold into box shape and secure edge as shown.


 Step 4: To the left is what the box will look like when laying flat. To the right is what it looks like when opened up at a stand.


Step 5: Add adhesive to the edges of the insert piece and secure to the inside of the box. This is looking at the box from the top view.  Stamp the flowers, stems and leaves onto cardstock. Color as desired and then die cut with the matching dies. (picture not shown, I forgot that one. Sorry)


Step 6: I found that laying the box flat on top of the envelope helped me to position the pieces without going over the edge. This helps as it will slide right into the envelope and nothing gets torn.  :-)  Position the first bloom along the back with some leaves peeking out the edge. I didn't actually adhere the bloom at first until I knew how it would look.


Step 7: After I adhered the flower I folded up the box to see what it would look like.


Step 8: Start to layer as desired the remaining blooms. Notice (below) that my first one is moved a little. I found that you were not able to see it as well so I just removed it carefully and moved it up a tad.


Step 9: Added more leaves and a smaller bloom. Here is the card standing up. Now you can finish decorating as desired.


The final card in a box using Peony Muse. My sentiment is from Sweet memories stamp set die cut using a few dies. Added another peony bud to the edge, some sparkle to the petals and some sparkling enamel dots. I have another mom's card to create, in the meantime hope you get a chance to create your own. Have a wonderful day. 

Wednesday, April 26, 2017

Tiger Lily Gift Box Tutorial


Good morning. Today I am finally getting the Tiger Lily Box instructions for you that I promised. It has been crazy busy with school and sports that I just needed to sit down and get it done. Besides my sister was wondering if the second box was going to be for next years teacher at the rate I was going. ha ha  So let's get started. I did try to take the photo's in my light box, but it was to hard so its on the front counter. Hopefully you won't mind.  :-) 


Supplies: Cardstock, designer paper, scissors, Tiger Lily XL stamp, giftbox punch board, scoring tool, foam mat.


Step 1: Stamp out two flowers and some leaves. You could do another layer if desired, I kept it with just the two as before.  Color as desired. Cut out each flower and leaf as shown.


Step 2: To pop the leaves up on the box you will need to cut in between the petals but not all the way to the center. They have a natural break line to the center and I use that as my guide. The flower on the left shows how far I cut into the center between the leaves.


Step 3: Once you have cut between the petals you can use the scoring tool to help roll the flower petals in an upward motion. I use this first, then I tend to use my finger to give it more of a rounded look. It will flex as you handle the petals so don't worry if it doesn't stay the first few times. Do this to both flowers and the leaves and set aside.


Step 4: This box is a little thinner and taller than my original to make it different for the other teacher. I used the measurements for the large box, 11 x 11 sheet of paper on the giftbox punch board instructions. To secure the flower to the box without having to tear it open, I have added a belly band to the box. Cut two pieces of solid card stock 1/2 inch width x 11 inch length. Score both pieces at 1 inch, 4 3/8 inch and 8 1/2 inch as shown.


Step 5: Turn strips opposite of each other, add adhesive to the inside of the right strip and secure to the back of the left piece. It will leave the little flap up as shown to the right below. Add adhesive to the little flap, that will be hidden on the inside. If this is confusing, don't add adhesive at first just wrap around the box for a visual.


Step 6: Place box in center and wrap around. I have it held in place to show you. Add adhesive to the left far edge strip and secure over the top of the box. The little flap will be secured on the inside of the band.


Step 7: Take your flowers and add dimensionals to the middle. I forgot to photo the flower stems in the middle earlier as you see them now. These will be added to the center and secured with a dimensonal as well.


Step 8: I find it easier to handle the flower and roll the petals with the belly band off the box until finished. Layer the flowers and secured to the belly band. and roll the ends up and out as you prefer. Secure the center and slide the belly band back onto the box to finish final details. Decorate as desired.


Step 9: My final Tiger Lily giftbox in pink.  The leaves are secured onto the belly band under the petals so when it slides off as you see below it is all one piece. I added some sparkles to the petals and rolled them a bit more once on the box.


Voila! I hope you have time to create a gift today and have fun. Enjoy your day! 


Friday, December 16, 2016

Goodie boxes

Happy Friday! I don't know about you but two snow days in the same weeks makes for some great time hanging out sledding, movies and hot chocolate. YUM!!!  Wednesday night we had a bunch of snow dumped on us and even work was cancelled. GASP!  What fun we had sledding... Back to school today for everyone though. Now I can get all my goodies baked and put into these boxes. The Power and Spark challenge this month is Sweet Treats. Perfect time for me to get these boxes done for our friends. Hope you can play along. You can check it out HERE on the PP Blog. 

All three boxes are very similar in design using Spice It Up for the sentiment. The tiny sprigs of holly are from Heaven and Nature Sing stamp set. These are super easy boxes to make using the Cookie Box tutorial. I die cut the sentiment panel using Matted circles die layered onto a Elegant Oval die cut. This first box has Peaceful Poinsettia's die cut and layered on the corners with some green sprigs and brown flourished die cuts. The designer paper is from the Holly Jolly paper pack. Sparkle added to the flourishes on the paper and all around. Finished it off with some sequins.  


This one has paper from the same pack with poinsettias in the corners as well. Instead of sequins a few random jewels but similiar in design. 


My final box I used some Hollyberries I had left over from a print or two ago and colored them up. Then I cut around them again to pop them up on the box front. I have the same paper pack on this one and more sequins and sparkles. Voila! I bake up some goodies each year and this year they will have a pretty box to hold them. The goodies never last long but they sure will enjoy the box after I hope.  :-)  


Check out the Bloom Brigades creations today: 
Cindy Lawrence
Tosha Leyendekker


Friday, December 9, 2016

Basket of goodies

Christmas is getting that much closer, how are you on those cards? I only have a few left to make and then I will be onto next years. Yea!  Grabbed my Simple Joys stamp set once again and stamped out this basket of greenry. Oh it just makes me swoon! 


Colored the basket of greenry with various Copic markers. Die cut a stitched rectangle for the image and then the base layer. This is a Z-Fold card with some designer paper added to the base. The inside you can see I lightly stamped the holly in the corner and added some matching flourished jewels to the edge. voila! 


Don't forget out Sweet Treats challenge is still running and you won't want to miss all the additions. 

Be sure to check out the Bloom Brigades creations today:

  Cindy Lawrence
  Julie Koerber
  Kathy Jones
Katie Sims


Wednesday, September 21, 2016

Happy Thoughts gift box

Good morning! Just a quick little gift box today to share. I mentioned a few weeks ago that I had gotten some new sunflower stamps and this is another one called Sunflower Bouquet. I think this array of flowers and sunflowers in the bucket is so pretty. I have colored them with various Copic markers and die cut the shapes with a few Spellbinders dies. 


The base is some designer paper that I also stamped the sunflower seed stamp from the set as a background and some faux stitching. This box is made using my Graduation Hat tutorial but I cut the box down a little. Instead of 7x7 it was 6x6 measurements. The same with the 7 1/8 it was 6 1/8 measurements. Follow the same instructions for the box itself.  Fun little box that I added some dove chocolates to for a friend. Voila! Thanks for stopping by today!