Wednesday, December 14, 2011

Snow Wonderful


Today is day 1 of Flourishes December release with the new set called Snow Wonderful. The creations with this set are outstanding! Another fabulous set that goes perfectly with our Tailor-Made Classic Keyhole die from Spellbinders. My creation is cozy and sweet today. The birds were calling out to me for this card and some felt snowflakes. The copic collections I used for coloring are the Sky Collection, Creamy Collection, and Fields Collection. My ribbon has some white lace trim along with the soft blue wrinkled ribbon tied off with some felt snowflakes. There is glitter on the snowflakes and the pine needles, however hard to see in the photo.


Be sure to check out the creations from the Design Team:


Release Reminders:
**10% savings when you purchase the New Release Bundle.
**Mystery Blogger. Comment on each Design Team members Blog post for the day you could be our Mystery Blogger and win the set of the day.
**Head on over to Flourishes Blog at NOON for the noon challenge and your chance to win the entire release.
**Pre-Release Challenge Feminine Flair, your chance to win our entire release!


Sunday, December 11, 2011

Secret Bench

 Files: I am unable to add the PDF files you need to this post. If you email me at Twinshappy1@yahoo.com and put the subject line Secret Bench, I will email you the files. I have a PDF version, Silhouette version and a SVG file version.

Supplies

Card stock, small decorative metal die, scissors, desired sentiment and adhesive.


Step 1

Take the back of the bench piece and in the middle score 1/2 inch up and 3/4 the way up. I only have one score mark shown, however please make the second score mark for ease later. Set this piece to the side for a moment.


Step 2

Add adhesive to the bench sides. Pre-fold the sides once adhesive is on, now add these to the back of the bench. 


Step 3

This is what it will look like with one side panel attached. Attach the panels to the back so you don't see the seam from the front. Stand your bench up and fold in a little bit to form the shape. It will be a little loose till we add the bench seat section. 


Step 4

Take the bench drawer and score at 1/2 inch on just three sides. Pre-fold and add your adhesive to those three sides as shown. If you would like to decorate the lid of your bench now is the time to add your papers or stamped images.


Step 5

Lay the bench on the back side and place one edge of the bench drawer in the corner lining it up with the bottom score mark. If you have one side attached it should look like this. Now pull the other side of the bench over and adhere the other side to the scored mark corner. 


Step 6

Turn bench up right and take the bench lid and add adhesive to the back 1/2 inch scored flap. This is going to go on the back part of the bench to secure.


Step 7

I am showing you the lid not attached but laying on the bench drawer. Your lid should lay flat and the back should match up with the last scored line on the back. Once it is lined up, secure to the back of the bench.


Step 8 

Add your secret goodies inside the drawer and finish decorating as desired.

Step 9

I added a pillow to my bench using the sentiment from In God's hands. The pillow is made using the same chocolates that are inside the bench. Enjoy your new Secret Bench. 


Friday, December 9, 2011

Feminine Flair Challenge

Happy Friday! Can you believe we are already into December 9 days? Holy smokes this month sure is going fast. Flourishes is getting ready for the December release and today is your chance to win our entire release by playing in our Feminine Flair Challenge. Head on over to the FLLC Blog to see all the details and linking your creations!


I went super feminine and girlie with my pearls, pink, and lace. This card has a matching little gift tin that I will be showing you later this month. My card is using the beautiful feminine Lace and Trim set. I have cut it out and then cut around the edges to make it look like actual lace. The sentiment is from Tag Lines stamped out on Spellbinders tag and popped up on dimensionals. I hope you get a chance to play along with us! Be sure to check out the creations from the Design Team:
Julie
Dawn
Danielle
Barbara
Tammy
Sharon


Wednesday, December 7, 2011

Invites for Christmas Party

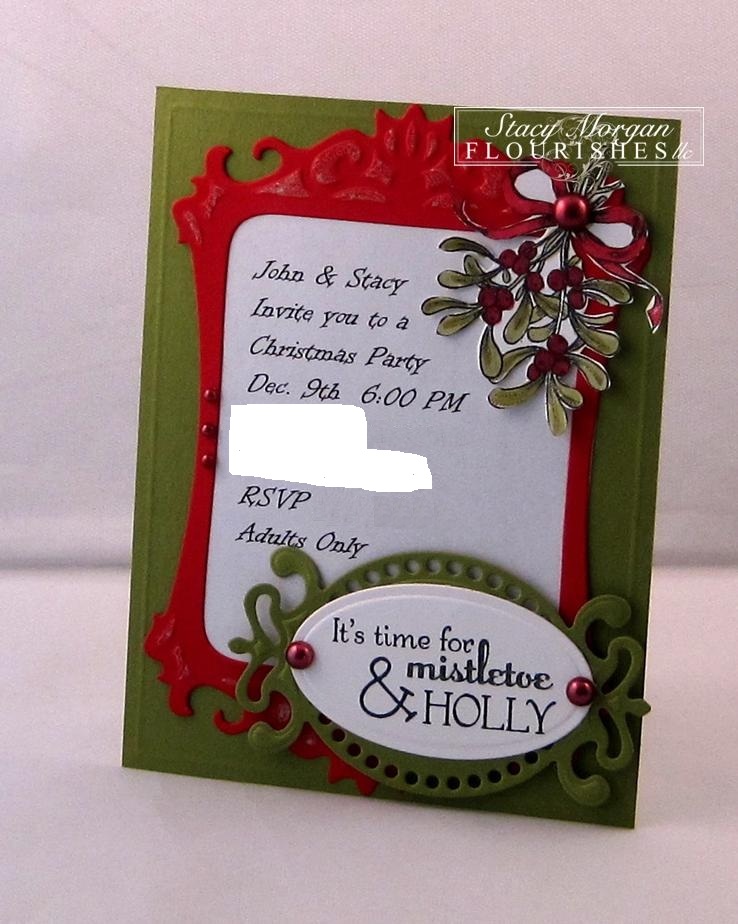
This year we are hosting a Christmas party at our house for the group at my husbands work. Here is what the invites look like. Now the sparkle does nto show up much and its really too bad as they are gorgeous with the sparkle. I used the Gelly Roll Stardust Pen around the Spellbinders frame, on mistletoe in the sentiment from Meet Me Under The Mistletoe stamp set and all over the holly leaves. Really does look cool IRL. All the panels are up on dimensionals to really add to the invites. Several mentioned how cool it was that I made the invites and they looked awesome. Makes me feel good and I know that hubby appreciates the compliments for me. hee hee We have our menu figured out, house cleaned and all the food bought. Now to relax and enjoy the party. Hope you have a wonderful day!


Monday, December 5, 2011

TS Monday White Christmas

Happy Monday! Today on the Totally Stampalicious Monday challenge its a White Christmas. Let's see some snow on your creations. This adorable Winter Bird Snowman was perfect for the challenge. The snowman has sparkle all around his frame and then on the ground, hard to see in my photo. Added the sentiment using an oval punch and tied it off with some silver cord. Easy Peasy today. Hope you get a chance to play along with us. Don't forget:
Stampalicious Dessert Menu
Level 1 - Vanilla Ice Cream - Buy 5 Get 1 Free
Level 2 - Strawberry Shortcake - Buy 8 Get 2 Free
Level 3 - Triple Layer Chocolate Cake - Buy 11 Get 3 Free


Friday, December 2, 2011

Flourishes Free for all Friday

Happy Friday! It is December 2nd if you can believe it. How are you on your Christmas cards? Got mine just about finished, next is to address and mail them all out. Oh boy that will require a cup of hot cocoa and an hour to fill out. ha! Today is Flourishes free for all Friday. We are focusing on the 2012 calendar download that we are offering for $2 this year. It makes wonderful little gifts. This is for a coworker of DH's that has a cubical and not much desk space. I took our new Tailor-Made Classic Keyhole die and I punched out the center of the top and added the paper in between the two for a nice little hanger. The mittens are from Warm Winter Wishes set, with a bit of super fine flower soft added to the tops. Be sure to check out what the girls created today with the calendar download:
Christine
Cindy
Julie
Dawn
Danielle
Barbara
Tammy
Sharon


Thursday, December 1, 2011

Ho Ho Ho... Merry Christmas

Happy December! Yes I am still alive everyone just overly busy at the moment. Recovering the dining room chairs for a week although it is gorgeous, I sure do have a lot of things to catch up on. Kids have half days of school so that throws a wrench into all my to do lists also. I do promise to get around to bloggin again very soon.
Right now it is Flourishes Christmas Spirit Challenge 20, Ho Ho Ho Merry Christmas. Create a christmas card with Santa in mind. Use St. Nicholas image, presents anything he would bring Christmas eve. Be sure to link your creations back over at the Flourishes Blog!

This is the best Santa image ever, I am telling you. This is Santa, I Believe and finally found out how to stamp him in brown and have it look right. I am thrilled with this card. Pulled out my Stampin Up chalks from ages ago and colored in the cheeks, holly and his eyes. Added some super fine flower soft to the hat and a bit of Gelly Roll Stardust pen to the wire rimmed glasses. For a last minute touch added the sentiment from the set Christmas Sentiments. Be sure to check out Sharon's Blog today as she made a card for the Christmas challenge also. Have a great day!