Friday, March 29, 2019

Cheery Hello

Happy Friday! Power Poppy has a weekend stamp deal for you on Happy Crabapple and Flowering Branches. Check out the PP Blog for all the details as this is a weekend steal only. 
This is a rather easy card as I trimmed down the image panel to fit the front of the card front. Colored with various Copic markers.


Added a textured pink panel for the base and some scallop behind the image panel. My sentiment with a pearl accent  and a few more for the top. Voila!


Wednesday, March 27, 2019

Welcome Lizzy Love

Happy Wednesday! Need a baby boy card for a friend and she loves giraffe's so I knew this Lizzy Love was going to be perfect! I colored her with various Copic markers and then die cut with a stitched rectangle. 


Die cut some matching stitched scallops that I am rather fond of as of late to the top and bottom of the gingham paper.  :-)  Die cut a few balloons and added sparkles. The sentiment is from TE Many Minis Occasions stamp set. Wrapped a little bit of twine through the button and voila! She is going to love this. Thanks for stopping by today.

Monday, March 25, 2019

We've got this...

This is a new from Sassy Cheryl's collection called Bunny Assistants. Too fun! This was perfect for an encouraging card that I need to hand out. A simple design as I colored the image and then die cut with a stitched rectangle. 


Added a bit of gingham paper and a scallop edge to the bottom. Wrapped a piece of orange ribbon above the gingham edge and tie a twine bow with a button. A little bit of sparkle and voila! 


Friday, March 22, 2019

No Orchids here but on paper

Good morning. We surely do not have any flowers here right now as the snow has just finally melted. In fact today is the first day we are on the baseball fields. GASP!!! This is week 3 of baseball season and they are just now getting on the field. Its been a crazy year with our weather. The 3 double headers that were scheduled have been moved thankfully but that means long weeks ahead for April.
 Anyways... you didn't come here to hear about baseball. How about some flowers on paper?   This is Ruffled Wild Orchid from the Instant Garden collection oooohhhhaaaahhh! 


A simple design for this birthday card. I tucked the birthday sentiment in the corner of the leaves and then hit print.  Then colored with Copic markers in the lovely springy shades of purple. The scallop edge along the side and some silver cord. A few pearls and voila. Notice no sparkles? Yes I am feeling okay, just didn't put any on this one. HA!  

Check out the Bloom Brigades creations today:
Allison Cope
  Christine Okken
Cindy Lawrence
  Julie Koerber
  Kathy Jones
  Katie Sims
  Tosha Leyendekker


Wednesday, March 20, 2019

Friend you amaze me

My card today is using the set Vibrant Thanks. This card has several layers on top of layers which was not intended at all. 
I stamped the flower off on scrap paper before I stamped it onto the white base layer for just a hint of the image. The sentiment and the main flower are stamped onto the center white base. 


Then when I laid the vellum over the white base I stamped the flower lightly as I did the background. It really brought the flower depth out quite a bit that way and I didn't intend for that to happen, but it looks cool. To cover the glue dots holding the vellum over the white layer I added sequins to the corners. I really like how this turned out, heavy card or not.  :-)  Thanks for stopping by. Have a wonderful day! 

Monday, March 18, 2019

Card Box Four Tutorial with Natural Beauties

Good morning! Today I am going to show you the final part of my Spring Border gift set with a tutorial for Card Box Four. This is similar to the other versions just a little different for the front of the box. This is what the final box will look like when complete. 


Below is the tutorial for you using Natural Beauties for the box front since that is the clear stamp set that Marcy used for her Spring Border One and Spring Border Two digital versions. The Natural Beauties is like a mini me set, super cute!  :-)

 Step One: Cut a piece of card stock 9 inch length by 7 inch width. Score a 1 inch border along all sides. Add designer paper if desired as I have done here. Snip the ends of each corner, add adhesive and fold in to create base. Set aside.

 Step two: Cut a piece of card stock 4 1/2 inch width by 7 inch length. Score a 1 inch border on three sides. Add your desired decorative cut edge. Here I used Lawn Fawn's stitched scallop edges. Snip the two ends as shown.

 Step three: Add desired designer paper or stamp if you wish. I added silver cord to the bottom as I will be adding other embellishments later.

 Step four: Add adhesive to all edges and to the ends you snipped. Start by adding just the end to the box inside as shown. This is the view and way I adhere to make sure that it lined up with the box edge.

Step five:  This is the side view for you to see that it lines up. Next add one side at a time and press to make sure it adheres to the edge. This will help with the strength of the sides of the box as well.

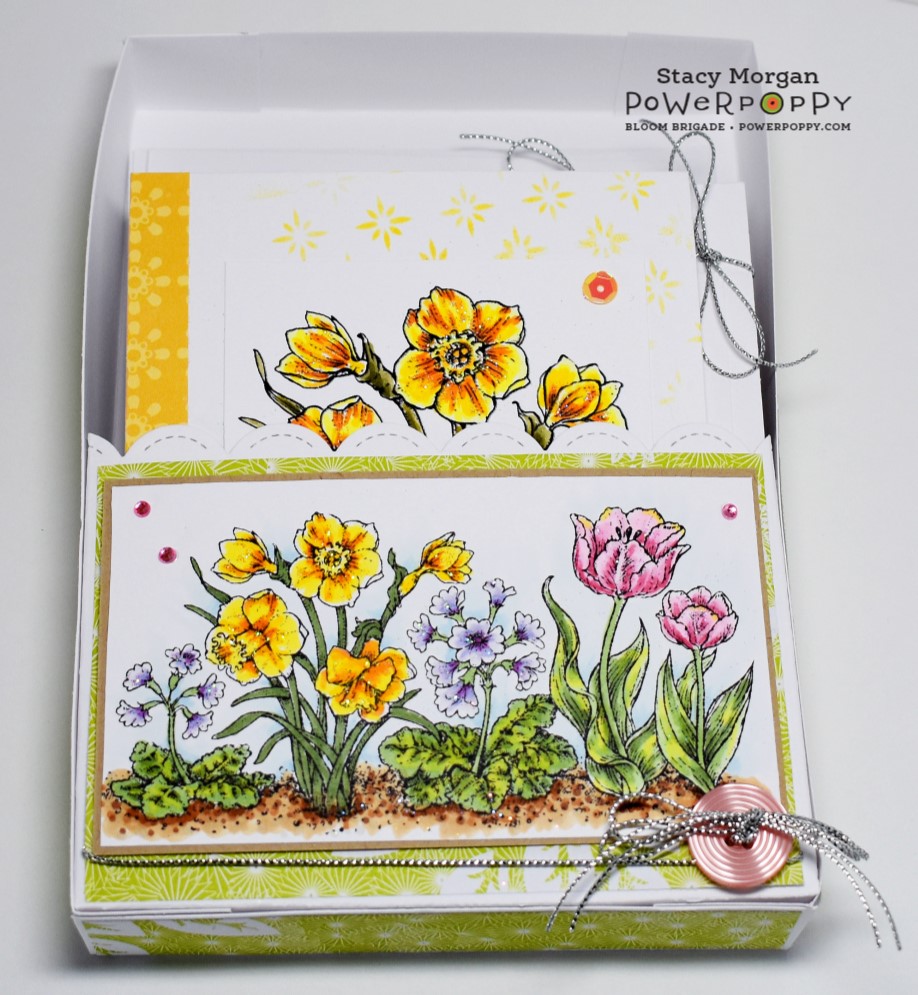
 Step six: This is what it will look like. Finish decorating as desired.

This is my finished box without the cards inside. I added a kraft layer behind my image from Natural Beauties and a button with matching silver cord. A few rhinestones and then some sparkle. 

Here is my final card box four again with the envelopes and the cards inside from the gift set. Voila! If you want to see the other versions of my card boxes just check the side bar at the top under Sweet and Classic Tutorials.  Thanks for stopping by today.

Friday, March 15, 2019

Trillium are wonderful

Happy Friday. The last of the cards for my Spring Border gift set. Check back on Monday and I will have a tutorial on Card Box Four that will be the box to hold this gift set.  :-)

My cards today are using Spring Border Two.  These are a little on the darker side of the color spectrum because I found this cool picture for the color inspiration. Check it out. They are so delicate looking. 


 Just look at that rich burgundy color of the petals, I just knew I was going with that for the larger one. Again keeping with the simple design of the others in the set with a few matching . 


The scallop die is another in the set that I bought and I am just loving. So you will see that a lot for awhile, sorry. hee hee  A few buttons with the silver cord and scrap designer paper. 


The inside says "such a blessing to me". Don't you like this simple and sweet set of matching cards? Boy I sure did enjoy making all these. I almost forgot how much fun they are to make. 


Voila! I hope you enjoyed the cards today. 

Be sure to check out the Bloom Brigades creations today:
  Allison Cope
  Christine Okken
  Cindy Lawrence
  Julie Koerber
Kathy Jones
  Katie Sims
  Tosha Leyendekker


Wednesday, March 13, 2019

Spring Border Two Lily of the Valley

Good morning. Okay I will admit it, once I got started on the Spring Border One set I knew I had to finish with a few from Spring Border Two. I can't help it, its an addiction. Honestly I have not done a complete set like this in a long time so I was way over due. HA!  Say hello to part of Spring Border Two
This is a picture of the two cards together. Similar design like the others with just a few differences. One of the main things I will point out is the new scallop die that miss Leslie talked me into getting.  :-)  Had to have it and I LOVE it! 


Again both are using up scraps of paper from the bin. Really am happy to start using more of the designer paper even the scraps. Added a button on these two and silver cord to keep them all tied together as a set. 


Both of these have the sponged star background verses just one of them. Sparkle on all the flowers themselves. Voila!


 Be sure to check back Friday for the fourth set in the collection I created. 
Have a great day! 


Monday, March 11, 2019

Tulips anyone

Morning. As promised the tulip set from Spring Border One to go with the ones on Friday. This is a group set of the two cards. Keeping in line with the same similar pattern and idea for the cards. A few changes to each one though. 


The silver cord is wrapped around the top edge and I used some rhinestones on this one. This was how I intended to die cut the edge on the daffodils and well that didn't work out right. I do like the way the scallops added to the other though. Again scraps of designer paper to the bottom. 


Next same sponged background as the other.  Sentiment in a different spot and I used enamel dots from Taylored Expressions for this card. Both have added sparkle like the daffodils. 


Now to work on the Spring Border Two cards for the set. I had not planned on making a little gift set but then why not.  :-)  Thanks for stopping by today. 

Friday, March 8, 2019

Daffodils anyone

Happy Friday! Last week Marcy released a set of new digi's remixed called Spring Border One and Spring Border Two. They are fabulous remixes that you should have in your collection. I decided to work on a few of the digi's in Spring Border One to start. Not to make this post so long I will separate out the cards and share the second set on Monday for you.  :-)  How about the daffodils today. Gosh knows I can use some sunshine and happiness with all this snow outside.  :-)  

Here is a picture of the two cards together. My goal was to go with a simple design for both. You will see on Monday with the Tulips in the new digi are going to see similarities in the set. 


My close up of the one. This is a great way to use up scraps of paper as well when you just use portions of the card front. A stitched rectangle for the image base. Various Copic markers for coloring. Just a little bit of silver cord wrapped around the bottom and a sparkly enamel dot for the top edge. 


The next close up you will see that I sponged a star like background with deeper shades on some and lighter on the others. A strip of scrap paper down the edge on this one. Added a die cut edge to the bottom and I actually cut the one edge wrong so I added the scallop edge beneath. Turned out ok though and then a few sequins to finish it off. 

This is actually turning out to be a fun little spring set. Be sure to check back on Monday for the tulip set.

Check out the Bloom Brigades creations today: 
Allison Cope
  Christine Okken
  Cindy Lawrence
  Julie Koerber
Kathy Jones
  Katie Sims
Stacy Morgan
  Tosha Leyendekker


Wednesday, March 6, 2019

Contract, Misc and legal place holders

One of the girls needed something other than sticky notes for the clerk each week. I offered to make up something that she can put on the top and be a little bit prettier than the sticky notes. This was my idea and I think they turned out perfect for her. 


A few stamp sets were used for these. The letters are from a CTMH set called Morgan's hand alphabet. Well I just had to buy the letters just for the name alone. hee hee  They were a pretty cursive font as well which was the main reason I bought the set.
 The flowers are Soothing Sympathy, Peony Muse and Prairie Cheer.  The only embellishment that they have is some sparkles on them since she has to laminate them. They turned out perfect and she loved them, so my job is complete.  :-)  Thanks for stopping by today. 

Monday, March 4, 2019

Thanks a blossoms

Morning. These blossoms are from Vibrant Thanks stamp set. They are simple and sweet and perfect for the quick thank you cards. The blooms are colored with various Copic markers and then pierced around the edges. A scallop edge for the left before I added to the base panel layers. 


More piercing around the base layers of the designer paper and then wrapped twine around the edges. tied off a button and twine combo at the top. A few sparkles for the flowers and some pearls to finish it off. Voila!

Sunday, March 3, 2019

March Stripes

 Well the March Dirty Dozen Christmas challenge is posted and I hope you check it out and play along. My card for the month is using a stamp from ODBD called Candy Cane with a meaning behind the sweet treat at Christmas. 


The sentiment was stamped in black ink first, then stamped very lightly the candy cane image. For a softer look to the coloring I used my aqua brush and some ink from the ink pad itself. I like the softer look and feel this has. Die cut with a stitched square and then layered onto some polkadot designer paper. Added swiss dots to the white layer for the base. A few pearls and voila!
Have a wonderful day.

Saturday, March 2, 2019

Live a Little Tulips

 My card is using the Dynamic Duos Tulips and Peonies. My designer paper wait... aren't you impressed that I am using more of my designer papers lately? I sure am proud of my self not only using the paper but I am enjoying the way it is bringing me out of my comfort zone a little bit.  :-)  


This feels to vibrant and bright I just love it. Again some piercing because I am totally digging it as of late.  A pennant flag for the left side since it was in the little stash of scraps. My sentiment to the right and one enamel dot. Voila!

Don't forget this Weekend Stamp Steal over at Power Poppy


Friday, March 1, 2019

Cloves and Pansies day

Good morning. This is Clover and Pansies a new release from Marcy as of late. Now I will tell you this photo is a little blurry also, but I figured out what was wrong. Unfortunately I already gave this card out so I can't retake the photo. But I am glad I figured it out, let's just call it "User error" and move on shall we.  :-)   Oh before I forget Marcy has a Weekend Stamp Steal for you to check out also. See the end of my post for details. 


This was printed and colored with various Copic markers then die with with a decorative Spellbinders die. I used the large matching dies in the shape for the green gingham and purple layers. Wrapped some white lace trim and then some purple sheer ribbon around the center before I adhered it to the base. 
Used a few Candi dots I think they were called from my stash and then some sparkles to finish it off. Voila! 

Be sure to check out the Bloom Brigades creations today:

  Christine Okken
  Cindy Lawrence
  Tosha Leyendekker
Along with our fabulous Weekend Stamp Steal