Saturday, February 18, 2023

Another bouquet of blooms

Good morning. I am really enjoying these blooms on Inky Bouquet. Colored these this week on conference calls and then was able to put them together last night and this morning. 

I was going for an apricot and purple-bluish feel for some reason this day. Colored with various Copic markers and then die cute with a stitched rectangle. Yes, I really like the layers with the main frame at an angle from the base cut out as you can tell lately. Just gives it a different look I think. Anyways, added a few enamel dots and my birthday sentiment. Then sparkle to finish it off. 


Black and yellow with a hint of blue for this one. Colored with Copics markers and then die cut the edge with a Spellbinders die. Wrapped a little bit of twine and a button for the sentiment tag. Anamel dots scattered and then some suduko gel pen around the flower petals.

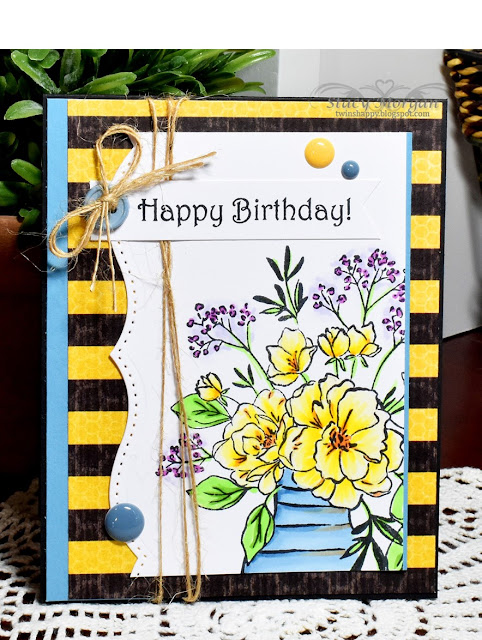
The red vase and the pink blooms was very pretty I thought when colored this. After I finished adding the designer paper and the red base paper it felt more like a Christmas thank you card. Not sure that was what I wanted but I guess this will work come December. ha ha  Did some faux stitching around the designer paper and the image panel. Then some brads and sparkle to finish it off. Voila! 


I am feeling a bit more comfortable getting back into coloring and creating again. Hope you are enjoying some crafting time also. Have a great day!

Tuesday, February 14, 2023

Bouquet three ways

Happy Tuesday. Colored up this weekend the new stamp set I got a few weeks back called Inky Bouquet and I even had time to create a post for this week after. I know amazing ha ha.. 

This first one did not turn out quite like I had imagined in my head. It is for a 25 year anniversary coming up. I thought it would look really cool all silvery and grey hues for the 25 year. But it was not as good as I thought so I added a little bit of pink shading to the edges. Added some vellum over lay on half the card and my sentiment. Then some silver die cut blooms and rhinestones to finish it off. Not as great as I imagined but I hope they like it either way. 


Next up is the classic blue hues that all flowers have to be colored in at least once in my opinion.  ;-)  I used mostly the top portion of the image for the main panel after it was colored with various Copic markers. Some of the awesome swiss dots that never goes out of style to the base layer and then some designer paper from the scrap pile. A few sequins and then added suduko gel pen to the petals but you can't see in the picture very well. 


Lastly my spring feeling one with only half of side view of the bouquet for fun. Colored with Copics again and some designer paper for the layers. My sentiment stamped on the matching bottom layer of the designer paper and then some rhinestones scattered about. This does have some of the sparkle added also but hard to see in the photo. I outlined just the petals instead of all over the petal itself. I like that look at lot lately. Voila! 


Thursday, February 9, 2023

Floral birthdays

More birthday cards and now I need to get creating some more that are coming up. I am behind again and hope I get a chance to take photos if I don't get them done too late. 
This is using Peony Muse where I masked several of the blooms to create the bunch. I do love this flower. Colored with various Copics and then die cut with a Spellbinders shape. Added some sheer ribbon tied into a bow and the enamel dots near the sentiment. Stickles for sparkle. 


This is using XL Chrysanthahum and I probably spelled that wrong but I do like the big bloom. After this was colored I thought to add some texture with an embossing folder. I should of thought that through as it did not turn out like I wanted. But it was colored already and done so I had to finish it off. Added a few buttons with twine combo and sparkles to the petals. Voila!


Monday, February 6, 2023

Birthday's

Evening. Here was a few more birthday cards I needed and got the editing the photo's for you. 
This guy is from an old Greeting Farm set I think called My Guy Ian. Oh he is super cute and so fun to color. Finally used one of the new dies I had gotten at Christmas of the balloons. Not sure who the die is from but I like the fun look of the balloons. Colored with various Copic markers and added some sparkle and enamel dots after he was popped up on dimensionals.


These daisies in Big Sexy Blooms are always so fun to color. Not sure I care for the center of these the way I colored them but it was already too late and I needed to get the card completed. Added some scalloped white to the left side and the die cut birthday sentiment to the center. Finished it off with some sparkle and sequins scatter about. Voila! 


Friday, February 3, 2023

Strong, beautiful and floral

Evening. Yes two post in the same week, but I have this set to post as I stated earlier this week. Some floral creations that I made. 
First up is Azaela's that is one of my favorite stamp sets yet. After the were colored with various markers, I did cut with the stitched rectangles die. Angled the imaged panel over the frame edge from the die on the base. Added a thank you sentiment to the middle that is using a scallop die. Some sparkles and enamel dots to finish it off. 


This is using Strong and Beautiful with two similar versions but subtle differences in the design. The one on the right has some suduko gel pen added to the flower pearls and the left has sparkles instead. Both have the twine and sentiment. Voila


That is all I have for creations right now. Hopefully I can get back to created and posting a little more often. Until then have a wonderful day!