Showing posts with label Spellbinders. Show all posts

Monday, September 30, 2024

Coloring fun

Evening. A few cards that I was working on the last few weeks. Took me awhile to get them colored and created but I finally got it done. This first one is using Pure Prairie I believe it is called. Very simple with the designer paper behind the flowers. Some textured embossing to the base mostly with a blue strip of paper down the left edge. Added sparkle for fun. 


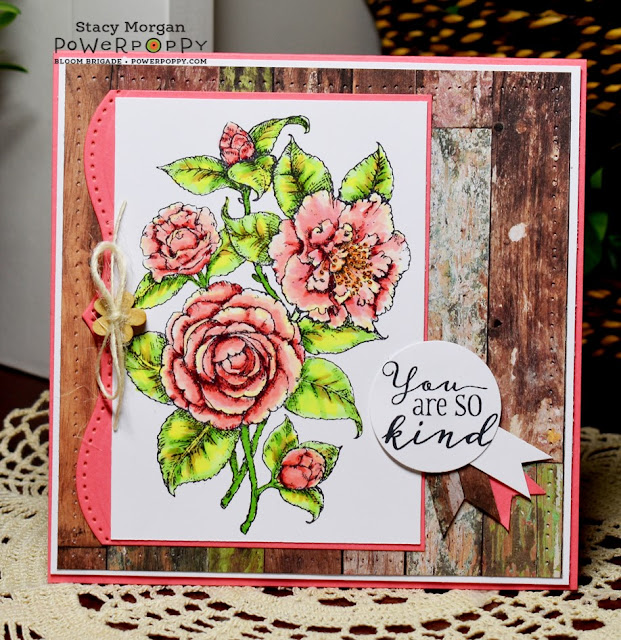
Next up is using Vibrant Thanks. These did not turn out like I had envisioned but they will do. Using up some more of the ribbon and pearls that I have in the bags. Textured the base layer on this one and a die cut edge and my sentiment panel. 


This next one used a die cut edge and the same ribbon as above but jewels instead of pearls. Sparkles to finish this one off. 


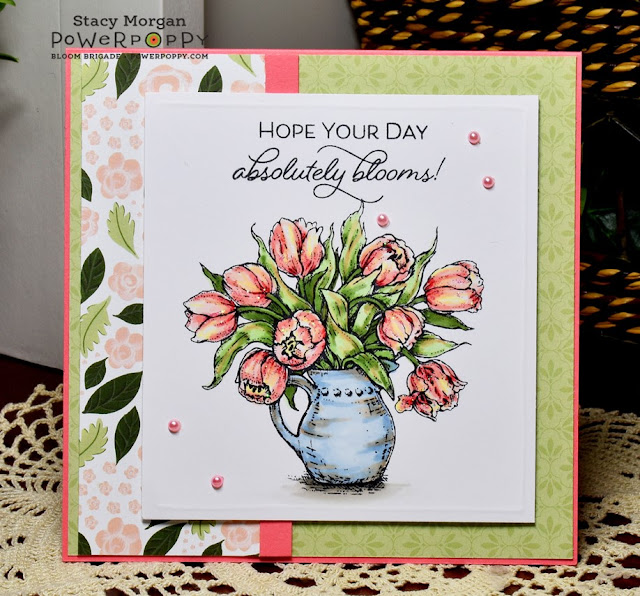
This one is with Countryside Bouquet that has such a fresh feeling I thought when I was coloring. Added some soft ribbon to this and my sentiment is popped up on some supper fat dimensionals. I did not realize how high they sat until it was too late. Looks okay I guess. 


Then my last one using the same set with green and yellow hue colors. A scalloped edge down the side with some designer paper underneath peaking out. A few enamel dots to the corner and sparkle to call it good. 


Hope you are able to get some creative time in or at least enjoy the fall weather that has started. Have a great day! 


Wednesday, June 26, 2024

Floral dump

A few floral cards today. Having issues getting some creative juices going so I looked back and recreated some older versions that I have done. Started to feel the juices a little again, thank goodness! 


This is a sunflower from Heartfelt creations that is colored with various Copic markers. Some faux stitching around the border and rounded the corners on the image panel. A few brads accents and then some suduko gel pen to the petals.


Second sunflower using pink and brown hues on this one. Die cut heart edge along the embossed piece with faux stitching again along the base panel. Some enamel dots with a twine and button corner. Topped off with sparkles. 


Another set of Hyancinth and Hellebore set. Wood grain based layer and a fancy die cut layer below the bloom. Some sequins accents and sparkle added to the water and the blooms. 


Last is the pretty pink Hellebore with very simple stitched layers and some sequins accents. Of course added sparkle to finish this off. Voila


Sunday, June 23, 2024

Sunday lambs

Good morning. Dusted off a really old set called Loving Lambs to create the other day. I had to make myself sit down and crafts especially since we bought fathers day cards this year. Been a long time since I had bought a card. A good reminder to get ahead of the stash when its really low. Anyways... 


This first one has some soft woodgrain paper for the background. Die cut a heart border with some ribbon wrapped around with a bow. A few tiny pearls for the corner and voila. 


This one I used a few of the scrap sizes from the next card to make a smaller one using the little praying lam. Textured the base layer and added some pearls to the corner. My sentiment is stamped along the side and yes it is not straight. ggrrr.. I usually don't stamp after I color but it was minimal I thought it would be fine. Guessed wrong. 


Next is using one of the large lambs in the set. Wrapped some lace trim and ribbon around the center. Pearl accents and some sparkle of the bell. Voila! Have a great day. 


Saturday, February 18, 2023

Another bouquet of blooms

Good morning. I am really enjoying these blooms on Inky Bouquet. Colored these this week on conference calls and then was able to put them together last night and this morning. 

I was going for an apricot and purple-bluish feel for some reason this day. Colored with various Copic markers and then die cute with a stitched rectangle. Yes, I really like the layers with the main frame at an angle from the base cut out as you can tell lately. Just gives it a different look I think. Anyways, added a few enamel dots and my birthday sentiment. Then sparkle to finish it off. 


Black and yellow with a hint of blue for this one. Colored with Copics markers and then die cut the edge with a Spellbinders die. Wrapped a little bit of twine and a button for the sentiment tag. Anamel dots scattered and then some suduko gel pen around the flower petals.

The red vase and the pink blooms was very pretty I thought when colored this. After I finished adding the designer paper and the red base paper it felt more like a Christmas thank you card. Not sure that was what I wanted but I guess this will work come December. ha ha  Did some faux stitching around the designer paper and the image panel. Then some brads and sparkle to finish it off. Voila! 


I am feeling a bit more comfortable getting back into coloring and creating again. Hope you are enjoying some crafting time also. Have a great day!

Friday, August 26, 2022

Simple Kraft colors and card

A friend's daughter asked me to create a few cards that would be quick and easy for a group of friends. These were two that I showed her that were rather easy with little coloring and some textures. I do like how kraft or white cardstock give you the option of little work as the splash of color sets it off well. This first one is using Alluring Lily if you have the digital image, or Tiger Lily that I have used here. Not using the whole image is a great idea for quick cards also. 
Some simple coloring with colored pencils for the petals. Added swiss dots for the textured background and then a die cut scalloped edge. Finish off with my sentiment and some sequins. 


My second one using the digital version if you have it Dahlia or in my case the Dahilia XL stamp.  Same thoughts for this one but a different embossed background and color. I added more white colored pencil to the petals on this one and I think was my favorite. She liked both and thought the variety for colors would be good. Either way Voila! :-) 


Friday, January 14, 2022

Lilac's and relax

Morning! Busy week however I am working in creations when I can. This is using Lilac Time which is retired but a digi version called Lilac and Lemons you can still purchase. Pulled colors from the designer paper with the hues of purple and yellow for my lilacs. Works well since there is lemons in the stamp too.  ;-)  


Wrapped lace trim and some ribbon around the base layers. My image panel onto a Spellbinders die cut bottom and popped up on dimensionals. Tied a bow and then some enamel dots and sparkles to finish it off. Voila! 


Tuesday, January 11, 2022

Flowers for January

How about some flowers instead of winter or Christmas cards? This first one is using Simply Camellia's stamp but you can get a digital version also called Camellia's. They are stamped on white cardstock and colored with various Copic markers. Used some the woodgrain paper pack I got back in November for the base layer. Pierced around the edge to match the Spellbinders die cut edge I added to the base of the image panel. A few scraps of paper with fish tale ends for the sentiment circle. And then a flower button and twine to tie it all together. Oh and yes there is Suduko gel pen on the flowers but its hard to see in the photo. 


Sorry this is another retired stamp but the digi version is called Tulips in Hobnail Pitcher. The designer paper was the color choice on this one with the soft pink and hints of yellow. Scored around the edge of the image panel after I colored the flowers. Popped it up on dimensionals, scattered some pearls and hints of sparkle to finish it off. Voila!


Thanks for stopping by!

Tuesday, November 9, 2021

Thank you Maize

Morning! Had sometime to color when I was working on my gift tags the other day. This Maize for Days was just the right image to color for my thank you card. I know the picture is crooked and I thought I saved it with the correction apparently not, oh well. 


After I printed the image I colored with various Copic markers and then die cut with a Spellbinders oval die. This designer paper from the pile was my inspiration for the colors. Added a textured orange layer to the card base. My sentiment panel and a few enamel dots and sparkles finishes it off. Voila! Have a wonderful day. 

Sunday, December 6, 2020

12 Days of Christmas day 6


Today is day 6 of the Power Poppy 12 days of Christmas. Marcy has a bunch of prize info and sale going on over on the Power Poppy Blog for you to check out. While you are there be sure to check out  Barbara C post using the new Enchanted Branches Nativity or the digi version. 

I am seriously behind in my gift tags this year. A lot of people look forward to them on their gifts. I think it adds a sweet and thoughtful touch as well. These didn't take too long to create and I know you are thinking I am nuts since you see all that fussy cutting. But honestly that is what took the longest. 


The stamps really do all the work for you. I put the sentiment along the side of the sweet little lamb and a star above. I stamped, colored and cut around two sprigs of greenry for each tag. Die cut with a decorative die, layered onto green cardstock and then die cut with another die the base layer in designer paper. Wrapped the ribbon and tied it off with some buttons. Sequins and sparkles to finish it off. Okay they may have taken a little longer but I only made 3 of these so not too bad.  ;-)  
Head over to the Power Poppy Blog for more eye candy and all the prize info and links etc. Whohoo!!! Have fun! 


Friday, July 10, 2020

Kind Friday

Happy Friday! Figured I should pull out my Poppies stamp set since it has been awhile. This happens to be on sale too if you haven't gotten the set yet. Stamped the flowers and colored with various Copic markers. Then I delicately cut around the leaves and petals. I forgot how much tiny cutting this particular image has but too late I had already started. 


When it was all cut out I added Dimensionals to the back to pop it up off the gingham base layer. A decorative die base and my sentiment. A few enamel dots from the bin and sparkle. Voila!

Check out the design teams creations today too:


Wednesday, June 3, 2020

Make a wish trio

Good morning! Dusted off another retired set that is a favorite for the girls this time. This was called Make a Wish. Three cards using this set and my first one is using the shoes. I colored them with various Copic markers and then die cut with a circle to layer over the decorative layers. Added some flourished pearls and my sentiment panel. 


My second card is using the crown on the pillow form the set colored with Copics as well. Die cut with a decorative square die and layered onto some embossed layers. Flourished jewels on this one and more flowers. 


The last one in the set is with the wand as the focus and no sentiment. I think the gingham paper with this is just darling. Added a ribbon and bow and some sparkles to this one also. 


Grabbing these older sets sure has been fun. I need to work on a few more requests. Thanks for stopping by. 

Wednesday, May 13, 2020

Grape day

This guy looks so content in his little grape bed. Another one of the House Mouse that was colored from last weekend. It is so much easier when all your coloring is done and you just have to put it together. ha ha!


Pretty easy since I knew when coloring this one I wanted it to be on the shaped die cut. Haven't used the big dies in awhile so figure this was going to be perfect for him. Added textured dots to the base layer panel wrapped with some lace trim and ribbon. A few sequins accents and some sparkle on the leaf. Voila! Have a great day!


Wednesday, May 6, 2020

Trio of leaves

How about a trio of Big Sexy Leaves creations today? It ended up being a trio because I wasn't paying attention while cutting and well I just ended up this way. My intention was to create a set of cards like I did with the large daisy stamp a few weeks ago. You can see those creations here if you want. I only got three cards out of this cut, but that is three cards.  :-)
First up I thought I would have a portion colored and the rest of the background a black and white for spot light focus yet as a strip instead of a circle.  So I stamped another set of the leaves for the background. My birthday sentiment with a metal swirl that has sat in the bins forever.


Here is the second card I created with a larger strip from the colored piece. I added some piercing down the edges of the green layer. My sentiment is from a retired set Party Time. A few enamel dots for accents. 


My last one where I cut the strips into three different sizes for a more clean feeling against the white base. Wrapped ribbon and twine around the top. Die cut a Father's day Sentiment and a button with twine. 


Now I just need to stamp out the leaves again and cut it the right way. ha ha  Thanks for stopping by!

Sunday, December 1, 2019

Through the woods with the Dirty Dozen

Today is Power Poppy's Christmas Re-Mix blog hop Day 12. As well as the first of the month and that means the Dirty Dozen Christmas challenge is posted up on SCS. You can check out the challenge and play along with us if you want.
Only one more day of our blog hop. Sure hope you are enjoying all the eye candy and the fun creations everyone is sharing. Today Marcy has a new clear, yes I said clear stamp for you.  She just keeps on giving doesn't she.  This is called Serene Scenes, and oh my is it awesome! See the post on the Power Poppy Blog for the full set and sentiments. Don't forget about today's sale 25% OFF STOREWIDE -- use code THINKSMALL


My gift tags are a little behind this year as I am usually done, not the case. Here is a tag that has to be my favorite I made so far using Through the Woods stamp set. Oh this bow again in the gold and yellow is just awesome! I stamped this out and colored with various Copic markers and then cut around the image.
I knew that I was going to use more of the shimmery gold paper and thought why not emboss some swiss dots for the base. A fancy die cut in the burgundy paper and added all the layers. More suduko gel pen to the ribbon image and some gold sequins and voila!  

Check out the Bloomie and Instant Gardeners creations for today:


  Barb Walker
Gloria Stengel
                                    Stacy Morgan *** You are here***
Power Poppy Blog

****Time is running out to play in my $20 Power Poppy gift card giveaway. Check it out HERE****


Friday, October 18, 2019

Fall birthdays with Plenty of Leaves

Good morning. Crazy she has a post right, well it hasn't been that long since my last post. Sure seems like it. I am soaking up the boys senior year activities and football season right now. I did get a chance this weekend to color a bit and it was so relaxing. That means yes, I do have few cards to share with you.  :-)  
This first one using one of the newest digi's called Plenty of Leaves. Oh I just love this, especially since you can create a whole canvas or just part depending on the sizing. I started off smaller for my card well and what time I had to color it. ha ha  The digi has a few single leaves and sentiments so go check it out.


After I colored everything with various Copic markers I then die cut with a decorative die. A few layers of matching card stock with some lace trim and ribbon wrapped around the center. Stamped a birthday sentiment in the middle with a few enamel dots accents. Finished it off with some sudoko gel pen which the camera never picks up. But it does sparkle at an angle and Voila! 

Be sure to check out the Bloom Brigade creation by:


Monday, September 9, 2019

Sunflower birthday's

Good morning. Dug out a few of my sunflower stamps this last week and made a few creations. This one is from Heartfelt Creations and I do believe it is retired. Some of the image is trimmed off from the circle die cut as I layered a base with scallops. 

The base has some added faux stitching to the edge along with sheer ribbon and twine wrapped around the top. Colored with various Copic markers and added to the base. Tie off a heart wood button and my birthday sentiment. Voila!